 button on the Windows Title Bar.
 The Debtor Financial Tab allows you to post financial transaction to the claim, view previous payments, client balances, and project interest.
You may choose to expand or contract any of the Blue titles sections of the program for a more complete view of the data. Take your cursor and hover over the edges of the section or column header to display the splitter bar icon and hold down your left mouse button dragging the splitter to the desired location. This change will remain in effect until you exit CollectMax.
Additionally, CollectMax can be expanded to full screen by clicking the button on the Windows Title Bar.
From this tab you can access and modify the most following fields of information:

The Account section lists the CollectMax Account Number assigned to this account when it was added. To change the assigned account number, see How to Change the Debtor Account Number.

The Debtors section lists the debtor names and the number of debtors attached to this account. On some page tabs, the data on the screen will be specific to the debtor who is selected. Additionally, the selected debtor may have an affect on requested documents.
The display shows up to 2 debtors at a time. Click the scroll buttons on the right to display additional debtors. To add a debtor to an account, see How to Add Additional Debtors to an Account. To remove a debtor from the account, see How to Delete a Debtor from an Account.
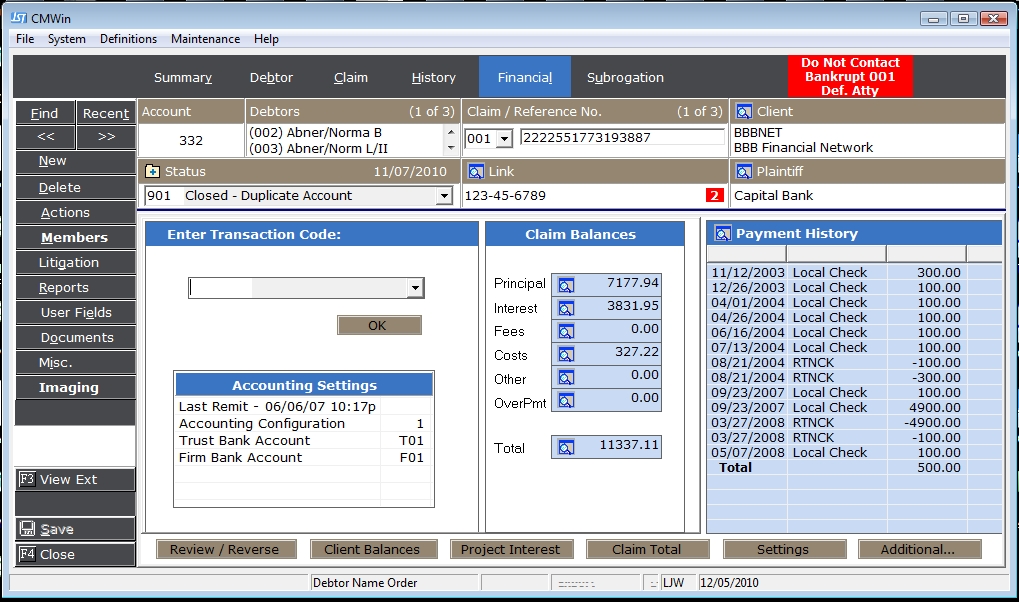
The Claim/Reference section lists the claim and reference number of the account you are viewing and the number of claims attached to this account. The reference number is typically the account number given by the original creditor of this account. To view another claim, click the  button and select another claim.

On some page tabs, the data on the screen will be specific to the claim that is selected at the time. Additionally, the selected claim may have an affect on the requested documents.

The Client section lists the
Client to which this account has been assigned. The Client can be either a Creditor or a Forwarder. The Client is typically who owns the debtor currently or the Forwarder who send the debtor for collections. For additional information about the assigned client, click the  button next to Client.
To change the Client attached to this account, see Client ID Reassignment.

The Status section lists the current status of the selected claim and the date it was changed to this status. Status codes should show you at a glance where the in the collections process a particular claim is.
To
change the status, click the  button and select the status
and click the
button and select the status
and click the  button. To add a new status code, click the
  button and see add
new status codes. To update the status on all accounts at one time or to back date the status change date, see Modify the Status.
button and see add
new status codes. To update the status on all accounts at one time or to back date the status change date, see Modify the Status.

The Link section lists the number other accounts linked to this account and allows you to access them. Linking allows users to link other like accounts using a single like number. Click the button
to view all other accounts. For more information on Account Linking, see
How to Link Accounts.
For automatic debtor linking, see Social Security Linking.

The Plaintiff section lists the
plaintiff attached to this account. Accounts may not have a plaintiff attached. Typically plaintiffs are assigned to accounts whose Client is a Forwarder. For more information on the plaintiff, click the button. To add a plaintiff to an account, see How to Attach an Account Member to a Debtor's Account.
![]()
In this section, you can chose the transaction code to be entered on this claim. See Enter Financial Transactions .This section also lists some Accounting settings including the Last Remittance date, Accounting Configuration, Trust and Firm Bank.

This Claim Balance Section list the current claim or client balances including new interest.
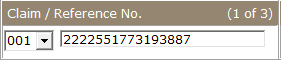
The Payment History Section lists all payments posted on this claim in CollectMax. To view more detail or to print a Payment History Report click the  button. See Debtor Payment History.
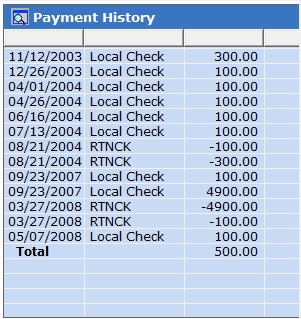
Click the  button to display the Client Balance Section. Depending on the Accounting Configuration of the Client, these balances may reflect totals for all accounts attached to this client or only balances for the selected claim and these balance maybe adjusted from the account level or client level.
 : Allows you to Review posted Transactions or Reverse posted Transactions. See Review/Reverse Transactions.
 : Allows you to view the Client Balances.
 : Allows you to project interest into the future to obtain a future payoff. See Project Interest.
 :Allows you to view the Claim Total Report. See Claim Total Screen .
 : Allows you to view and edit the account settings and the view the client settings.
 : Allows you to view or access the Payment History Report, the Employment Screen, the Debtor Bank Screen, the Payment Plan Screen, the Settlement Screen and add a Financial Note. *Financial Notes are a Version 8 Feature.