 button to go to the
Mass Account Processing Screen. Select
the
button to go to the
Mass Account Processing Screen. Select
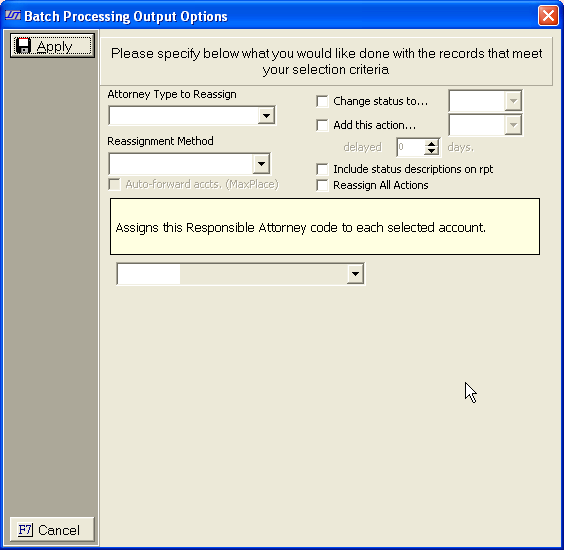
the The Attorney Reassignment Feature allows users to change the assigned attorney codes on the a batch of accounts at one time. Users can assign the Responsible, Originating, Receiving and Assigned From attorney settings. Several methods can be used to decided what attorney should be assigned such as open date range and balance.
From the
Main Screen of CollectMax, click the button to go to the
Mass Account Processing Screen. Select
the ![]() tab. The
Attorney Reassignment Screen will be displayed.
tab. The
Attorney Reassignment Screen will be displayed.

 next to the selection.
  box and selecting
the responsible from the
box and selecting
the responsible from the  list. Only
accounts with this responsible attorney will be included in this process.
list. Only
accounts with this responsible attorney will be included in this process.
Note: To have this process pick up accounts with no responsible assigned, click the  box only.
box and selecting
the Originating Attorney from the list. Only
accounts with this originating attorney will be included in this process.
Note: To have this process pick up accounts with no Originating Attorney assigned, click the box only.
box and selecting
the Receiving Attorney from the list. Only
accounts with this Receiving Attorney will be included in this process.
Note: To have this process pick up account with no Receiving Attorney, click the box only.
box and selecting
the Assigned From from
the list. Only
accounts with this Assigned From will be included in this process.
Note: To have this process pickup account with no Assigned From assigned, click the box only.
list. box next to Change Status To and select a status
from the list. box next to Add
this Action and select the action code from the list.
Enter the number of days Delay
until the action is due. box next to Include Status
Description on Rpt.
list. See
the following:Assigns all selected accounts to a single Attorney Code.
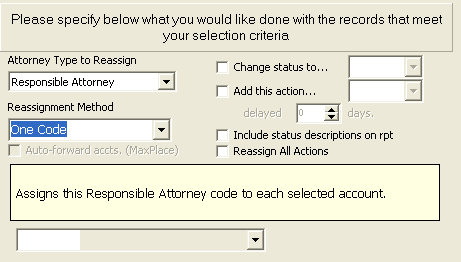
list. Assigned each Attorney Code Based on the existing Attorney Code.
![]()
list. list.
Note: Leaving the Current Code will pick up any attorney code. Leaving the New Code Section blank will remove the selected attorney code leaving the accounts with no attorney code.
Assigns the selected accounts evenly between a list of Attorney Codes.
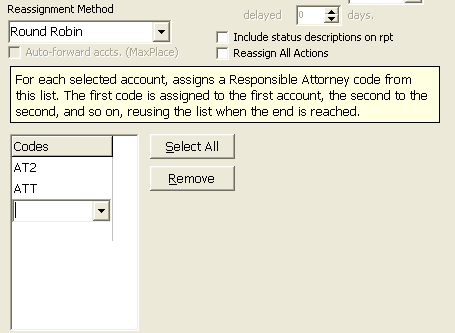
list. Next,
click below the first entry in the codes section and select the second
attorney to be included from the list and continue until
all attorney codes to be selected have been entered. Assigns the selected accounts to the selected Attorney code based on a debtor name range.

list. Then,
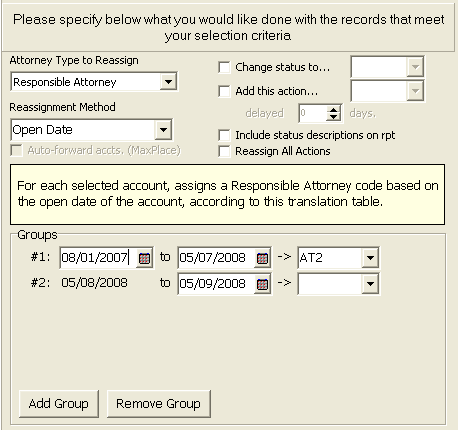
select the attorney to be assigned this debtor name range. lists. Assigns the selected accounts to the selected Attorney Code based on an open date range.
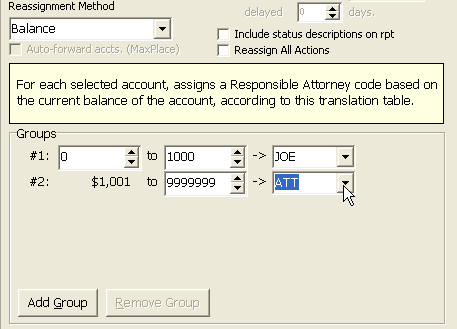
list. list.Assigns the selected accounts to an Attorney Code based on the account's balance due.
list.Once all
selections have been made, click the ![]() button to exit the
Output Options Screen.
button to exit the
Output Options Screen.
Double check
the selection criteria, and then click the  button to begin
the attorney reassignment.
button to begin
the attorney reassignment.
A confirmation message will be displayed.

Click the
![]() button to continue the process. Click
the
button to continue the process. Click
the ![]() button to discontinue the process.
button to discontinue the process.
The process
will now search the records for accounts matching the selection criteria.
To stop
the process, click the ![]() button. Otherwise a Preview report
will be displayed.
button. Otherwise a Preview report
will be displayed.

All accounts to be reassigned will be listed on the report with the new attorney reassignment.
To print
the report, click the  button. To
export the report to a file, click the
button. To
export the report to a file, click the
 export button.
Once the
Preview report has been reviewed for accuracy, click the
X to exit the report.
A confirmation screen will be displayed.
If the preview
did not pick the proper accounts or the assignment is incorrect, click
the ![]() button to stop the process.
button to stop the process.
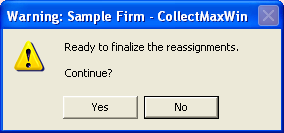
If the preview
was correct, click the ![]() button
to finalize the reassignment process.
button
to finalize the reassignment process.
Note: JST recommends doing a snapshot prior to finalizing the reassignment.
A Final report will be displayed.

The report will list all account numbers that have been changed an the new attorney assignment.
To print
the report, click the ![]() button. To
export the report to a file, click the
export button.
button. To
export the report to a file, click the
export button.
Click the X to exit the Final report and complete the reassignment process.