 button.
 1.
From
the main screen of CollectMax. Click
on the button.

2.
Click
on the  button .
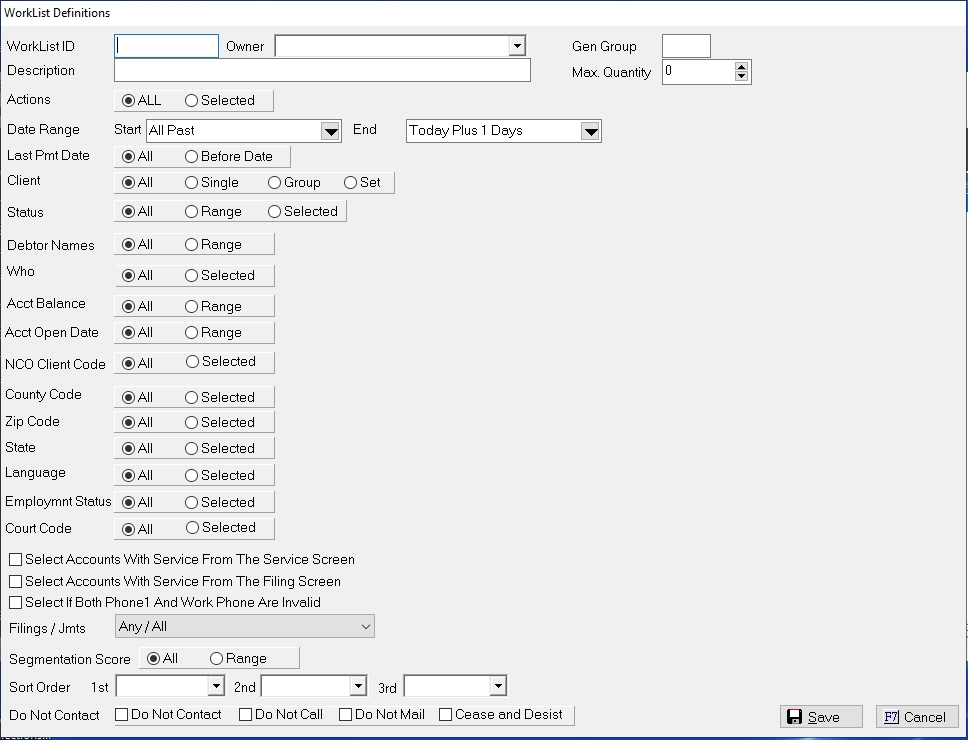
3. The Worklist ID is unique file name assigned to the list. Type the name of the worklist to be created. If the worklist belong to a specific operator, you may want to use their initials to identify ownership. CollectMax restricts this ID to up to four characters or numbers.
![]()
4.
Click
on the  arrow to
select the Owner to be assigned
to this list. The owner can be a specific user code or a team of users.
arrow to
select the Owner to be assigned
to this list. The owner can be a specific user code or a team of users.
![]()
Note: If you assign an single user code to the owner, no other users will be able to access this worklist except that user and any supervisors.
5. Enter a Gen Group Code. The Gen Group allows users to group like worklists to generated at the same time.
![]()
6. Enter a descriptive name for this worklist in the Description Field so that it easily will identify whose list it is and what type of work it will include. Examples: 'John's Follow-Ups' or "DFG's Worklist'.
![]()
7. Select the maximum number of actions to be included on this worklist by clicking it the Max. Quantity field and typing or using the arrows to select the maximum number of actions. If you leave the Max at zero then all actions that met this worklist's criteria will be included on this list.

8. Select from the following options to determine which actions for accounts will be included in this worklist.
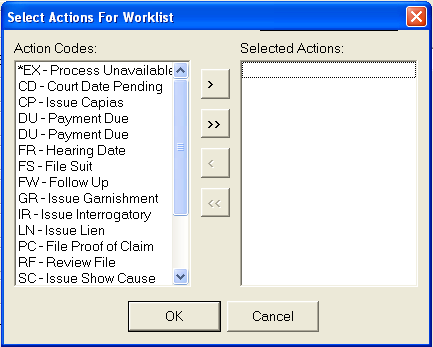
You can choose all or restrict the worklist to one or more action items. Select All to include all actions on this worklist or pick selected to include only specific actions on this worklist. If picking selected, a window entitled 'Select Actions for Worklist' will be displayed.
 .
.
On the left column is a list of all the action items currently defined on your system. The right column will be blank until you select one or more action item types and move them over. To select an action item from the column on the left, use your mouse to click on the action code, then click on right arrow. The action will be moved to the column on the right. You can continue selecting actions individually or you can hold down the Ctrl key while clicking on actions to be selected. All the action item types you select will remain highlighted. Click on double right arrow to move all the selected actions to the right hand column. If you make a mistake, you can select the action from the right column and click on the left arrow. The action item will move back to the original column. To move all the action items from one column to the other you can click on double left arrow.
Select
a date range of action items to be included on your worklist, you will
need to select starting and ending points for the actions. ![]()
Both lists provide for two to three columns
to select from.

For example, you can define a list to include action items from the beginning of last week to the end of this week. Only action items with dates within this defined range will be included in the worklist
Click the arrow in the Start
Field to select the starting point for this worklist.
Click ![]() to save your selection.
to save your selection.
Click on the
arrow in the End
to select the ending point for this worklist. Click
![]() to save your selection.
to save your selection.
Select the clients to include on this worklist. Choose All Clients, an existing Client Group, or a Single client.
Single clients are selected by client ID or by name. The Client Find Screen will appear on your screen:
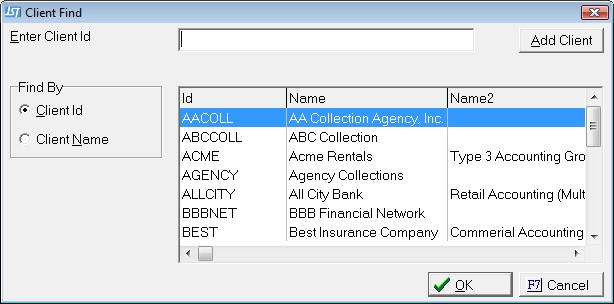
Choose how you would like the find the clients to be listed, either by client ID or by client name.
Existing client ID's and client names will appear on the
screen. Select
the single client for this worklist and click ![]() .
.
If you select Group, a
drop down box will appear on your screen: Click on the arrow
to display the existing client group ID's and a description of each. Click
on the client group you want to select.
If you select Set, a
drop down box will appear on your screen: Click
on the arrow to display the existing client set and a description
of each. Click
on the client set you
want to select.
Select the Status codes to include on the worklist. Select All if the worklist is not to be dependent upon status code range. If you would like for the worklist to include only those action items that are assigned to debtor accounts that fall within a particular status code range, select Range.
![]()
If Range is selected, Click on the arrow
in the first box to select the beginning status code in the range. Click
in the second box to select the ending status code in the range. Only
action items assigned to debtor accounts that fall into this range will
appear on the worklist.
To select specific status codes, pick Selectedoption and the Status Code selection screen will be displayed.
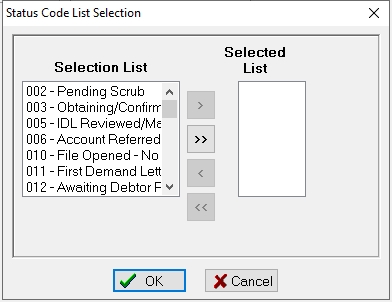
Select the code in the selection and click the right arrow to moved them to the Selected List until all required status codes have been selected. Click OK to continue. Use the double arrows to move all codes to or from the selected list and the left arrow to remove them from the list.
Select the Debtor Names to be included on the worklist. Select All to include all debtors regardless of the debtor's name.
![]()
Select Range if you would include only accounts that the primary debtor's name fall with in a selected range.
![]()
If Range is selected, two boxes will appear on your screen. Enter the beginning of the name range in the first box. Enter the end of the name range in the second box. For example, if the operator who owns this list is to work only those accounts with names beginning with A thru M, you would enter Aa thru Mz.
To narrow the actions included on the worklist to who is Responsible for the Action, Responsible for the Account, Originator for the Account or Operator for the Action. Select All if the actions assigned to this worklist are not dependent upon who is assigned to the responsible, originator or action. To narrow the actions, pick Selected.
Select the User Code or Codes from the selection list.
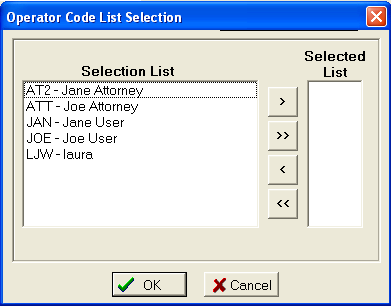
Click the
![]() button.
button.
Select Range if the assignment of action items to this worklist is dependent upon the following.
Click the
arrow and make the selection.
Next select
the users initial from the list
in the Is field.
Select the Acct Balances to include on the worklist. Select All if the assignment of action items to this worklist is not dependent upon balance of the accounts.
![]()
Select Range if the assignment of action items is depended up in balance range.
![]()
If Range is selected, two balance fields will be displayed on the screen. Enter the beginning of the balance range in the first field. Enter the end of the balance range in the second field. I.E. 5000.00 thru 20.00
Select to include account within a specified date range or to include all account regardless of open date.
![]()
If Range is selected, two date filed will be displayed on the screen. Enter or select the earliest open date in the first field. Next, enter or select the latest date in the second field. Only accounts with open dates on or between the date entered will be eligible for this worklist.
This option is only available to firms with the NCO Interface. Use this selection to narrow the selected actions for this worklist by the NCO Clients attached to the accounts.
Select to include only accounts with certain county codes attached to the primary debtor of the account. Select All if all actions should be included regardless of the county code. Pick Selected to narrow the actions by county code.
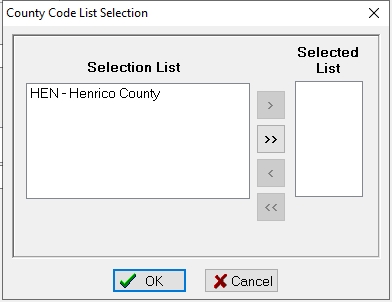
Select the code in the selection and click the right arrow to moved them to the Selected List until all required county codes have been selected. Click OK to continue. Use the double arrows to move all codes to or from the selected list and the left arrow to remove them from the list.
Select to include only accounts with specific zip codes or zip zones. Select All if all actions should be included regardless of the zip code. Pick Selected to narrow the actions by zip code.
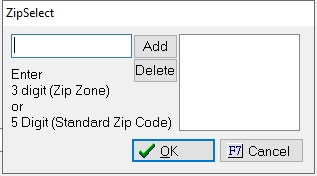
Enter the Zip Code or Zip Zone and click the Add button to add to the list. Highlight the zip or zip zone in the list and click delete to remove it from the selected list.
Once completed, click the OK to continue.
Select to include only accounts with specific primary debtor states. Select All if all actions should be included regardless of the primary debtor State. Pick Selected to narrow the actions by State.
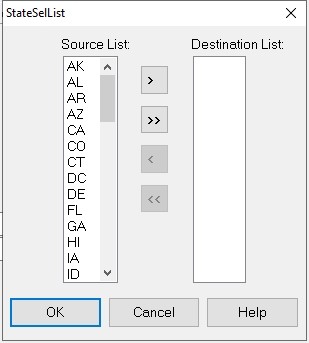
Select the code in the selection and click the right arrow to moved them to the Selected List until all required State codes have been selected. Click OK to continue. Use the double arrows to move all codes to or from the selected list and the left arrow to remove them from the list.
Select to include only accounts with specific languages. Select All if all actions should be included regardless of the primary debtor language. Pick Selected to narrow the actions by language.
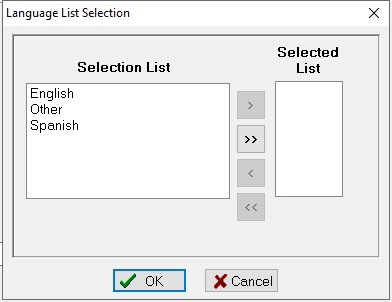
Select the code in the selection and click the right arrow to moved them to the Selected List until all required Languages have been selected. Click OK to continue. Use the double arrows to move all codes to or from the selected list and the left arrow to remove them from the list.
Select to include only accounts with a primary debtor with a specific employment status . Select All if all actions should be included regardless of the primary debtor employment status. Pick Selected to narrow the actions by employment status.

Select the code in the selection and click the right arrow to moved them to the Selected List until all required employment statuses have been selected. Click OK to continue. Use the double arrows to move all codes to or from the selected list and the left arrow to remove them from the list.
Court Code
Select to include only accounts with a selected preferred court. Select All if all actions should be included regardless of the preferred court. Pick Selected to narrow the actions by court.
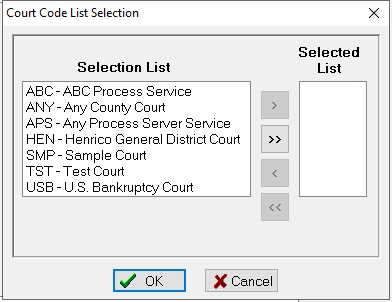
Select the code in the selection and click the right arrow to moved them to the Selected List until all required Courts have been selected. Click OK to continue. Use the double arrows to move all codes to or from the selected list and the left arrow to remove them from the list.
This is a Version 10 Feature. For information on obtaining this feature, please contact our Sales Department.
Select to include accounts that have a service on the Service Screen.

Select the type of Legal service on the Service screen.
Only accounts with the selected actions that have a service on the service screen for that litigation type will be included on the worklist.
Select to include accounts that have a service date on the Filing Screen. Only accounts with a service date on the primary filing and a selected action will be included on the worklist.

Select to include accounts that have an invalid phone number in both home and work numbers.
![]()
Check the ![]() box next to the Invalid Phone.
Only accounts
with both numbers matching invalid phone numbers list will be included
on this worklist. If
one phone number is invalid and the other is not, the account will not
be eligible for this worklist. Invalid
phone numbers are (111) 111-11111 through (999) 999-9999 and (123)123-1234.
box next to the Invalid Phone.
Only accounts
with both numbers matching invalid phone numbers list will be included
on this worklist. If
one phone number is invalid and the other is not, the account will not
be eligible for this worklist. Invalid
phone numbers are (111) 111-11111 through (999) 999-9999 and (123)123-1234.
Select to include accounts with filings and or judgments.
![]()
Click the ![]() button and select from the following:
button and select from the following:
This is for firms with the NCO Interface only.
9. Select a Sort Order to control the order of the actions to be worked in the worklist. Sorting methods include by Oldest Date, Newest Date, Balance, and Name.

For example, you may want to sort the worklist by newest date, then within each date by balance, and finally by name.
10. Select to narrow down the actions by Do Not Contact. Click the boxes next to the DNC options needed. Only accounts with selected actions and the selected DNC set will be included on the Worklist.

11.
Click
on the  button at the bottom of the screen to save your selections.
You are
now ready to generate a worklist.
button at the bottom of the screen to save your selections.
You are
now ready to generate a worklist.
See Real Time Worklists for information on real time additions to the worklists.