This feature will allow you to set your actions to automatically populate to the appropriate worklist. You can set the action to populate the worklist based on worklist definitions or a selected worklist each time the action is added to an account whether manually or by some automated process such as completion code. This removes or partially removes the need to regenerate your worklist regularly.
This is a Version 6 Feature. For information on obtaining this or any other features, please contact the Sales Department
To configure your system to utilize this new feature it must be turned on at the Action code level
1.
Go
to ![]() .
.
2. Go to Codes.
3.
Go to  .
.
4. Select any Action.
5.
Select ![]() .
.
6.
Select tab for ![]() .
.
7. Select Yes to allow the Action to Participate in Real Time.
![]()
8. Select the Worklists Assignment. The options are the following:
![]()
or
![]()
9. Select the appropriate radio button. The following option is available:

JST HINTS:
All Actions are set to a Default of “NO”. The steps above need to be done to each action.
If you decide to have all actions participate in a Real Time Worklist we can assist you with making that change on all your existing actions.
It is mandatory that you set up a regular Worklist definition prior to using a Real Time Worklist.
We recommend that you select “Yes” for item number 7. This setting will catch any actions that were not properly defined on a WorkList.
Please keep in mind that the Worklist itself is not operating in Real Time it is actually the Action code. The worklist will behave in the same way as before nothing has changed.
All actions if set to be used in Real Time worklist will function as such when you do any automated process such as adding New Manual Accounts, Batch Adding Actions, Document Automation, MaxPlans, MaxUpdater,New Downloads from Interfaces, Completion of Actions, AIM.
It is mandatory for a worklist definition to be created prior to using this new feature. If you are currently using worklists this section can be skipped.
1.
From the main screen of CollectMax. Click on the  .
.
2.
Select  .
.
3. Enter a Worklist ID this is a unique file name assigned to the list. Then enter the name of the worklist to be created. If the worklist belong to a specific operator, you may want to use their initials to identify ownership. This field will hold up to four characters or numbers.

4. Enter the drop down arrow to select the Owner. This is used to select the owner of the assigned list. If you assign an owner, no other users will be able to access the worklist.
5. Enter a GEN Group. The Gen Group feature allows users to group like worklists to be generated at the same time.
![]() .
.
6. Enter a Description. It is best to use a descriptive name for this worklist in the Description field so that it will identify whose the owner of the list or its purpose. Examples: ‘John’s Worklist’ or ‘Pre-Suit Worklist’.
![]()
7. Select Actionsto be assigned to the list. You can choose all or restrict the worklist to one or more action items. To assign all actions to this list, select the radio button for ALL. To identify one or more action items to be assigned to this list, select the radio button for Selected.
![]()
8. A window entitled Select Actions for Worklist should appear on your screen.

9. On the left column is a list of all the action items currently defined on your system. The right column will be blank until you select one or more action item types and move them over.
10. To
select an action item from the column on the left, use your mouse to click on
the action code, then click on ![]() .
The action will be moved to the column on the right. You can continue
selecting actions individually or you can hold down the Ctrl key while clicking
on actions to be selected. All the action item types you select will
remain highlighted. Click on
.
The action will be moved to the column on the right. You can continue
selecting actions individually or you can hold down the Ctrl key while clicking
on actions to be selected. All the action item types you select will
remain highlighted. Click on ![]() to
move all the selected actions to the right hand column.
to
move all the selected actions to the right hand column.
11. If
you make a mistake, you can select the action from the right column and click
on ![]() .
The action item will move back to the original column.
.
The action item will move back to the original column.
12. To
move all the action items from one column to the other you can click on ![]() .
.
13. Select a Date Range of action items to be included on your worklist, you will need to select starting and ending points for the actions.
![]()
14. Both lists provide for two to three columns to select from.
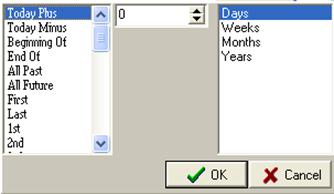
For example, you can define a list to include action items from the beginning of last week to the end of this week. Only action items with dates within this defined range will be included in the worklist
15. Click
the ![]() arrow
in the Start Field to select the starting point for this worklist.
arrow
in the Start Field to select the starting point for this worklist.
16. Click ![]() to save your selection.
to save your selection.

17. Click
on the ![]() arrow
in the End to select the ending point for this worklist.
arrow
in the End to select the ending point for this worklist.
18. Click ![]() to save your
selection.
to save your
selection.
19. Select the clients to include on this worklist. Users can choose All Clients, a Single Client, an existing ClientGroup, or an existing Client Set.
![]()
20. Select the Status codes to include on the worklist. Select All if the worklist is not to be dependent upon status code range. If you would like for the worklist to include only those action items that are assigned to debtor accounts that fall within a particular status code range, select Range. If you only want Selected status codes to appear choose the Selectedoption.
![]()
21. Select the Debtor Names to be included on
the worklist. Select All to include all debtors
regardless of the debtor's name. if you would include
only accounts that the primary debtor's name fall with in a selected range.![]()
22. Select Who, to assign action items to the worklist based on who the action or account is assigned too. Select All if the actions assigned to this worklist are not dependent upon who is assigned.
![]()
23. If you choose Selected you have the available options in the dropdown.
Responsible for Action: Operator assigned as responsible for working action.
Operator for Action: Operator who entered action item for account.
Responsible for Account: Operator assigned as responsible for working account.
Originator for Account: Operator assigned as the originator of account.

24. Select the Acct Balances to include on the worklist. Select All if the assignment of action items to this worklist is not dependent upon balance of the accounts. if the assignment of action items is depended up in balance range.
![]()
25. If Range is selected, two balance fields will be displayed on the screen. Enter the beginning of the balance range in the first field. Enter the end of the balance range in the second field. I.E. 5000.00 thru 20.00.
![]()
26. Select the Acct Open Date to include account within a specified date range or to include all account regardless of open date.
![]()
27. If Range is selected, two date filed will be displayed on the screen. Enter or select the earliest open date in the first field. Next, enter or select the latest date in the second field. Only accounts with open dates on or between the date entered will be eligible for this worklist.
![]()
28. Select the County Code to include on the worklist. Select All if you want all county codes to participate in the worklist. If you want only certain county codes to be included on the worklist use Selected.
![]()
29. If you option was Selected you will see this box appear then move the county code over that you would like for it to participate in your worklist.

30. Select the Zip Code to include on the worklist. Select All if you want all zip codes to participate in the worklist. If you want only certain zip codes to be included on the worklist use Selected.
![]()
31. If you option was Selected you will see this box appear then enter your zip code and click on ![]() . If you make a mistake click on
. If you make a mistake click on ![]() . After you enter your selections click the
. After you enter your selections click the ![]() .
.

32. Select to include accounts that have an invalid phone number in both home and work numbers.
![]()
33. Select to include accounts with filings and or judgments.
Claims Without Filings and Judgments: Only accounts without a filing and judgment date will be eligible for this worklist.
Claims Without Judgments: Only accounts without a judgment date will be eligible for this work list.
Claims With Filings: Only accounts with filings dates regardless of judgment date will be eligible for this worklist.
Claims With Filings but No Judgment: Only accounts with filing dates and no judgment date will be eligible for this worklist.
Claims With
Judgments:
Only accounts within the selected date range with a judgment date will be
eligible for this worklist. ![]()
34. Select a Sort Order to control the order of the actions to be worked in the worklist. Sorting methods include by Oldest Date, Newest Date, Balance, and Name.
![]()
For example, you may want to sort the worklist by newest date, then within each date by balance, and finally by name.
35. Select the maximum number of actions to be included on this worklistby clicking it the Max. Quantity field and typing or using the arrows to select the maximum number of actions. If you leave the Max at zero then all actions that met this worklist's criteria will be included on this list.
![]()
36. Click on ![]() after you are finished making your selections.
after you are finished making your selections.
JST HINTS:
If you make any modifications to a worklistand you have items currently on it. Please purge your worklist and the regenerate it to capture the new changes made.
When you check the box for invalid phone .Only accounts with both number matching invalid phone number will be included on this worklist. If one phone number is invalid and the other is not the account will not be eligible for the worklist.
On the worklist main screen you will see a grid that has columns . The Original column represents the total amount of items added to the worklist. The Remaining column represents the total amount left in that worklist. The Added today shows the actions added to a worklist on that day. The Completed column represents the actions Completed that day. The Generation Date column represents the last date the worklist was generated. Please keep in mind it is possible to have a Generation Date of 12/30/1899, if you never ran a generation from the worklis tmenu but only used Actions that participate in Real Time Worklists. The Anchor Date column represents the last time the
1.
Go to  .
.
2.
Select  .
.
3.
Enter your Debtor
Find selection then Click ![]() .
.
4.
Select .
5.
Select ![]() .
.
6. Under Actionuse the drop down and select your Action.
![]()
7. Enter Schedule date.
![]()
8. Addthe number of days.
![]()
9. Enter the Timethe action should be performed.
![]()
10. Enter the Responsiblefor the Action.
![]()
11. Use the drop down and select the proper Court.

12. Use the drop down and Attach To an Account or Claim.
![]()
13. Then
select ![]() .
.
14. The action should now be visible on a worklist.
1. If you go to the Main Menu.
2.
3.
Select  .
.
4.
Select ![]()
5.
Select ![]() .
.
6.
Double Click or Select  .
.
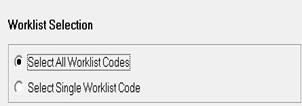
7. Select All or a Single Worklist.
8. Select the appropriate format for your report Detail or Summary.

9.
Select ![]() .
.
