Version 4 Payment Transaction Report Selection Criteria
Use the following
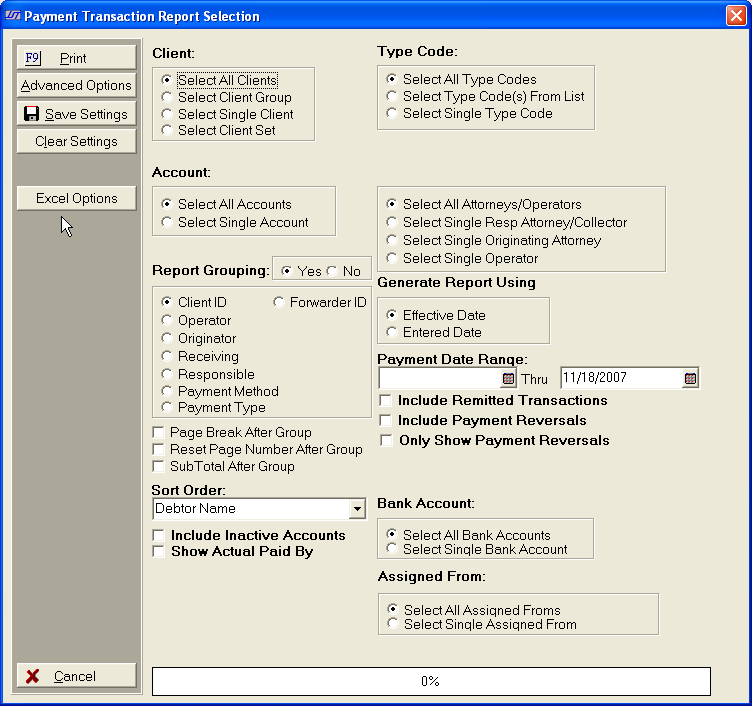
selection criteria to narrow down the accounts to be listed on the report
and to set the arrangement of the data on the report.
- Select
All Clients, Client
Group, Single
Client or Client Set.
- Select
Type Code. Click either All Type Codes,
Type
Code(s) from
List or Single Type Code.
- Select
All Accounts or a Single
Account.
- Select
include All Attorneys/Operators
or select a single attorney or operator.
- Click
Yes or No
for Report Grouping.
- Check
Page Break After Group to start each
Group listing on a new page. If left blank, the next Group in the report
will start after the previous Group with no page break.
- Check
Reset Page Number After Group to cause
the page counter to be reset to page #1 after each group. If left blank
the report will page sequentially until complete.
- Check
SubTotal After Group to provide
a subtotal for each group.
- Select
to Generate the Report using Effective
Date or Enter Date.
- Select the Payment
Date Range the you want printed on the report. This will include
any payments made within the date range regardless of payment release
dates.
- Check the Include
Remitted Transactions check box to include transaction that have
been previously remitted.
- Check the Include
Transaction Reversals check box to include transactions that have
been reversed.
- Check the Only
Show Payment Reversals check box to show only payment transactions
that have been reversed. This
is a Version 4 Feature.
- Select
Sort Order. Click drop down arrow
and click either Debtor Name, Claim Number, Reference Account Number,
Transaction Date, Transaction Number or Principal Balance.
- Click check box to include Inactive Accounts.
- Select to List accounts by the Paid By Debtor instead of the Primary
Debtor.
- Select to include payments posted to
all Bank Accounts or a Single Bank Account.
- Select to include payments posted to
Account with a Single Assigned From
or all Assigned Froms.
- To
include additional fields of information on a report, click Advanced Options button located on the left
side of the Report Selection Screen.
- To
save these report settings click Save
Settings button.
- To
export a copy of the report to Excel, click the Excel
Options button located on the left side of the Report Selection Screen.
- To
generate report click Print.
Then select to print to File,
Printer, Screen
or Cancel generation of report.
- Payment Transaction Report Sample
- Payment Transaction Reversal Only Report Sample