 button to bring
up the Find Debtor Screen.
button to bring
up the Find Debtor Screen. 1. From
the main screen in CollectMax, click the button to bring
up the Find Debtor Screen.
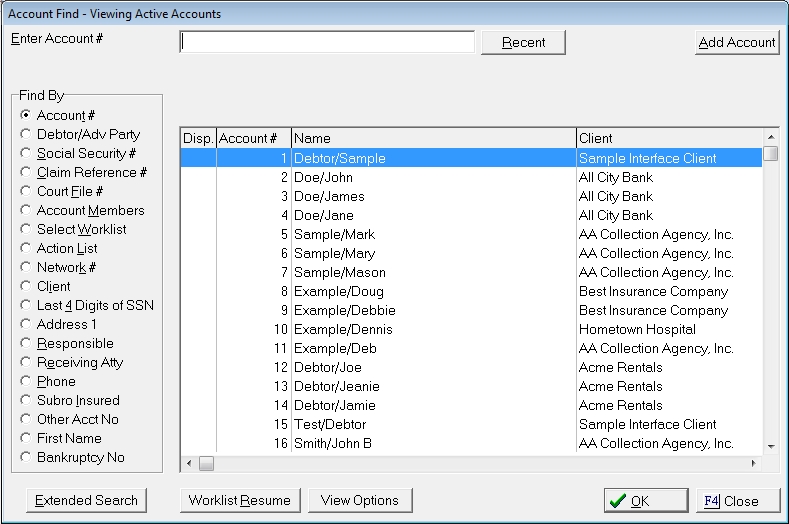
2.
Select
to Find By Select Worklist by
clicking the  next to the selection.
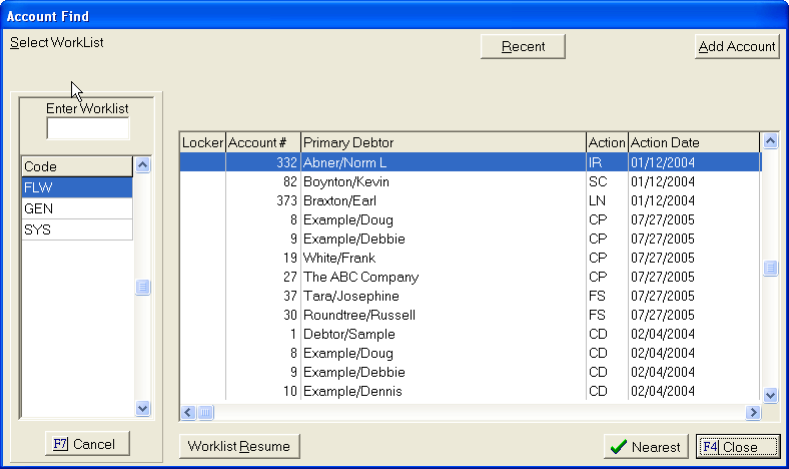
3.
Enter the
Worklist ID or scroll down and click on the Worklist entry to select the
proper Worklist. For Users without Version 4 or above, select the Worklist to be worked by clicking the
next to the selection. To the right a list of all accounts
assigned to this worklist will appear.
Note: The only worklists displayed are ones either assigned to this user code as owner or have no owners assigned.
4. Select the first debtor to be worked from the list. Users can select the first debtor or scroll and pick another.
5.
Click the
![]() button to go the selected debtors account.
button to go the selected debtors account.

Users will
be taken to the Summary Tab of the debtor's account. In
the Action Items section, there will be one or more actions with a ![]() button to the left of it.
button to the left of it.
This is the action that was included on this worklist.
Users can navigate through the debtors account from tab to tab, request documents, credit bureaus and make any changes needed to complete the action item.
6.
Once the
account as been reviewed and the user is ready to complete, advance or
refer the action, double click on the Action Item on the Summary Tab or
click the ![]() button to get to the Action Items Screen.
button to get to the Action Items Screen.

7. Select the Worklist Action Item.
8.
Click the
![]() button.
button.

9.
Select
the Completion Code from the  list.
list.

The Completion
code listing can be expanded by the user to include user-defined completion
codes. Click
the  button to add new completion
codes.
button to add new completion
codes.
See Right Click DU Advance for information on Advancing DU Actions on the Worklist. This is a Version 9 Feature.
10. If Advancing an action, enter the Scheduled Date and time to reschedule the action.
![]()
11.
If Referring
the action, select a new responsible from the list.
![]()
12.
Select a New Status from the list if the status code should
be changed on the claim or account.
![]()
13.
Select a document to be generated from the list. The
document will be added to the print list to be printed later.

If the document you have selected is set to change the status code on the account and you have also elected to change the status in the 'New Status' field, CollectMax will inform you by way of a message box that the status change of the document will take priority.

If this is
not what you want the system to do, respond ![]() to the message.
The system
will take you back to the status code change field of the completion code
form where you can change your selections.
to the message.
The system
will take you back to the status code change field of the completion code
form where you can change your selections.
14. If you would like to add a history note as part of this completion code activity, you can do so by entering the note in the field labeled History Note. This note will be saved in the debtor's history along with the completion code note.

15. Enter any promised payment amount in the Promised field.
![]()
16.
Click the  button to save your selections. The
system will auto-navigate you to the next account.
button to save your selections. The
system will auto-navigate you to the next account.
Note: When you have reached the end of the worklist a message will flash alerting you that you have reached the end of the worklist.
Using the
![]()
![]() arrows, will allow you to skip accounts
to work later or navigate through the accounts on the worklist.
arrows, will allow you to skip accounts
to work later or navigate through the accounts on the worklist.
To print a report of all the accounts in the worklist, see Worklist Entries Report.
For statistics on operators activities based on the worklists, see Operator Activity Report and Action Item Completion Report.
If you must exit the worklist
to access an account not on the worklist, you may return to the worklist
by clicking the  button from the Find Debtor Accounts
Screen.
button from the Find Debtor Accounts
Screen.