This feature allows users to group documents to print at one time instead of requesting each document separately.
From the
Master Document Screen, click the ![]() button. Select the Document
Style of Group Document. Enter
the Name and Description and
click
button. Select the Document
Style of Group Document. Enter
the Name and Description and
click ![]() button.
button.

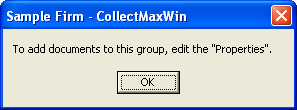
A message box will be displayed directing users to Properties to finish the Document Group setup.
Click the
 button to exit.
Click the
 button to display the Group Document Properties Screen.
On the Standard Tab,
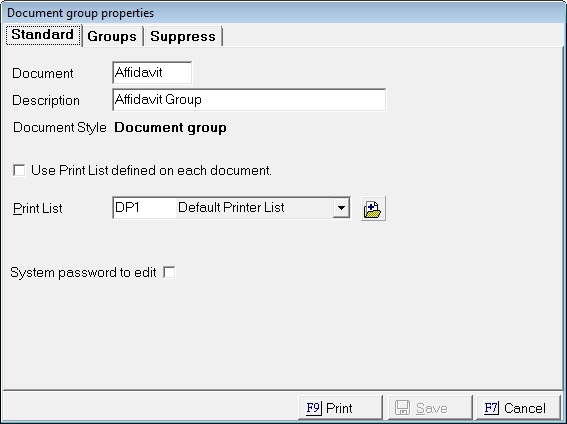
The Document Name or Description can be edited.
The documents in this group will print to the selected list or you can choose to have each document go to the print list attached to each document by clicking the  box next to Use Print List defined on each document.
If choosing to have all documents on the group go to one print list, select the proper print list from the  the list. To add an additional print list, click the
  button.
To require a system password to edit the group, click the box next to System password to Edit selection.
Select the
![]() tab.
tab.
Click the
 button to display the Document Selection Screen.

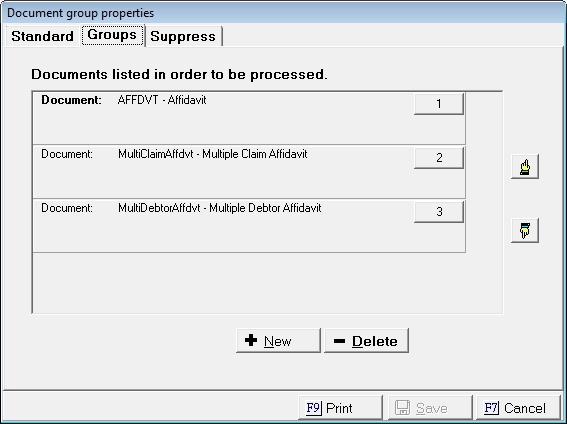
Click the
![]() button to select the first document from the list of
documents. Next,
click the button again and select the next document. Continue
until all documents in the group have been selected.
button to select the first document from the list of
documents. Next,
click the button again and select the next document. Continue
until all documents in the group have been selected.
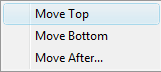
It is important that you order the documents in the proper execution order so that all document automation executes in the correct order. If ultimately you need to have the account at a certain status once all documents in the group are complete, then the last document to be executed should the one with that status change. You can reorder the documents in a group by selecting a document and clicking the 
 buttons to move the selected document up or down the list or you can click the number
  button on the document and select to move the selected document to the Top, to the Bottom or to Move After another document.
If selecting to Move After, the Move After screen will be displayed.
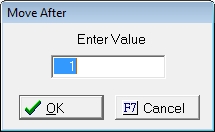
Select the Number of the Document in the Group that the selected document should be printed after and click the  button. Continue until all documents are renumbered properly.
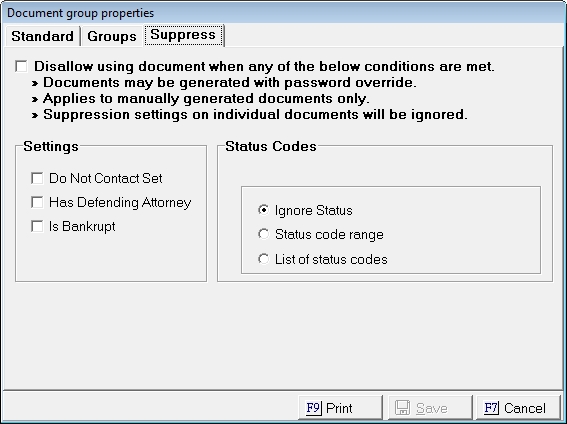
To disallow the documents in the group from being printed manually when certain criteria are met, click the box next to Disallow using Document sentence.
Select to disallow documents to be printed if an accounts has:
Click the box next to the proper selection(s).
Note: These options are not debtor specific. If any debtor is bankrupt or any debtor has a defending attorney attached the Document will not available to generate manually without a master password.
Select to not allow documents to be printed if an account has a specific status code.

Click the  button next to the proper selection.
Once all options has been selected, click the  button.
Note: This will only effect manual request documents. Batch processes and group documents will not be restricted. Each document can be still be printed if the protected password is entered.
For Suppress options on Group Documents, see Group Documents.