 .
.This report lists all the status codes in CollectMax with the number of claims that currently have each status. In V7 we have added a new feature to this report it now will display an aged section for you to determine how long a claim has been in particular status. This feature is beneficial to manage your collection accounts more effectively and protect accounts from slipping thru the cracks.
1. Go to the Main Menu and select .
2. Then select  .
.
3. Select “Status Summary Report”.
4. The screen below will pull up:
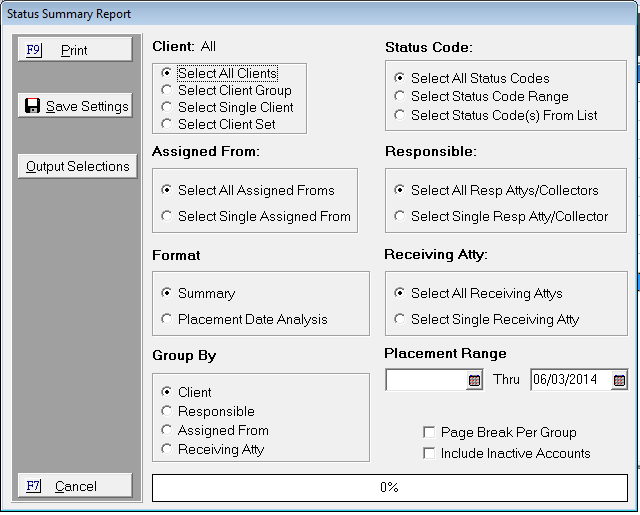
5. This screen is used to select criteria that you would like included on the report.
6. Select the appropriate radio button under the “Client” selection criteria. The options are “All Clients”, “Client Group”, “Single Client”, or a “Client Set”. The report will only include the option that you select. Please select the appropriate radio button.
7. Select the appropriate radio button under the “Status” selection criteria. The options are “All Status Codes”, “Status Code Range”, or a “Status Code from List”. This selection criteria is the most important for this report. This report will only review the status that you select. For Example: If you only select one status code to review, the report will only display that one status code.
8. Select the appropriate radio button under the “Assigned From” selection criteria. The options are “Select All Assigned Froms” this option all assigned from codes will be eligible for inclusion on this report regardless of the Assigned from code. The next option is “Select Single Assigned From”. If you select a single assigned from, only accounts whose assign from assignment is currently set to the selected code will be eligible for inclusion of the report.
9. Select the appropriate radio button under the “Responsible Attorney” the selection criteria. The options are “Select All Resp Attys/Collectors” and “Select Single Resp Atty/Collector”.
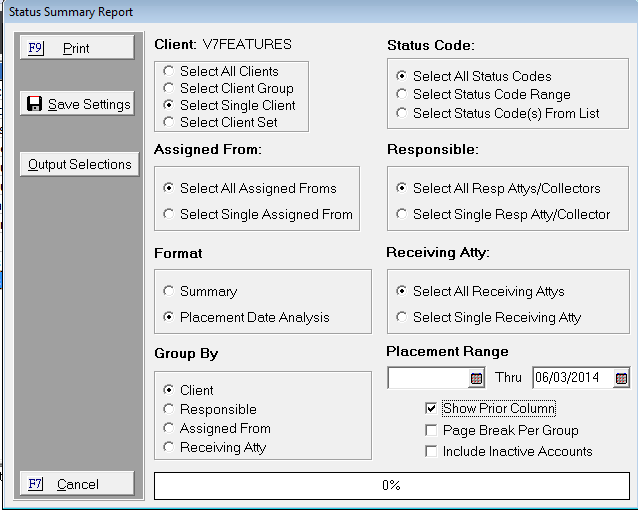
10. Select the appropriate radio button under the “Format” selection criteria. The options are “Summary” and “Placement Date Analysis”. The “Summary” format will produce a report that will list each status code with the number of accounts currently in each status by group. The “Placement Date Analysis” will export a file that will have a column for each placement month with a row for each status listing the number of accounts currently at each status for that placement month for each group.
Things to Remember: “The Show Prior Column” check box is only displayed for Placement Date Analysis” it is not available for the “Summary” option.
11. Select the appropriate radio button under the “Receiving Attorney” selection criteria. The options are “Select All Receiving Attys” or “Select Single Receiving Atty”.
12. If you choose to use the “Placement Date Range” it must have a beginning date for your placement date range and an End date range. To select your date range uses this  button, which is to the right of the blank box. It will also accept a manually entered date as well. The date format is MM/DD/YYYY format.
Things to Remember: Only claims with the open date on or between the select range dates will be eligible for inclusion on this report.
13. Select the appropriate radio button under the “Group By” selection criteria. The options are “Client”, “Responsible”, “Assigned From”, or “Receiving Atty”.
14. To select the “Show Prior Column” click the box. By selecting this option, the report will list a summary line to summarize all placements and transactions posted prior to the placement date range selected for this report. This selection will only display if you choose Placement Date Analysis. As displayed below:
15. To select the “Page Break” check the box. By selecting this option, it will start a new page after each group listing. If this option is not checked, the next group will start after the previous page and it will not include a page break.
16. To select the “Include Inactive Accounts” check this box. By selecting this option, it will include all inactive accounts in your report that match the criteria that you selected above.
17. After selecting your criteria you can select  button. The option is not needed to print the current report. It is used as a short cut when running future reports. If you use this feature, the next time this report is accessed it will show the settings that were saved.
18. Select  button.
19. This screen will appear:
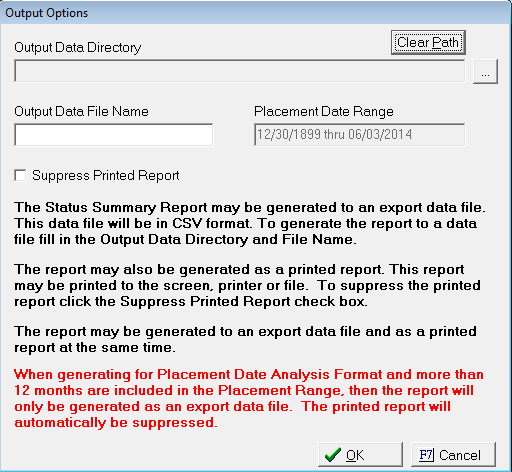
20. To select an “Output Data Directory” click the button. This will display your computer’s browser folder.
21. Select the proper path and then click the ok button of your computer’s browser folder.
22. If you select the incorrect path, select the ![]() button and repeat steps 20-21.
button and repeat steps 20-21.
23. Enter an “Output Data File Name”. The report that exports to .csv format will have this file name.
24. If you want to “Suppress Printed Report” click the box. By checking this box, no printed report will print to screen. You will see the path of the exported file.
25. After entering your selections under “Output Data Directory” and “Output Data File Name”, click the  button. If you need to cancel you can click
  .
.
Things to Remember: All options selected under Output Selection will be saved after running the report successfully.
26. After clicking the button. It will return you to the “Status Summary Report” screen.
27. Double-check your selection criteria, then click button. It will pull up the “Output Selection” options to verify. If accurate click the button.
JST Recommends: That you always print to Screen. It will generate the report faster and you are still able to print the report from this option. Please keep in mind, if you choose to “Suppress Printed Report” the report will not be displayed.
28. The report will generate based on your selection criteria. Example provided below.
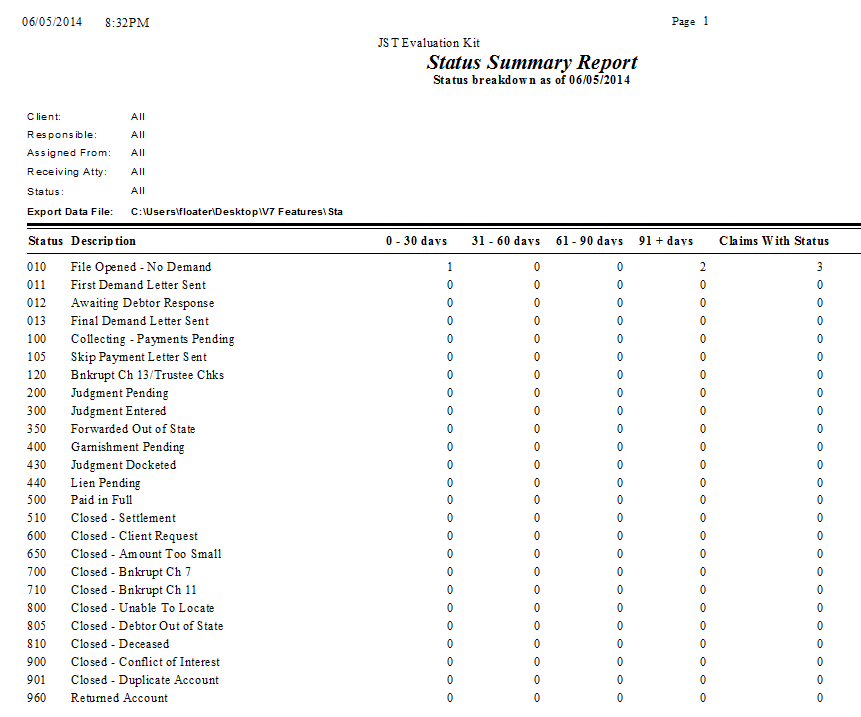
What’s New: In the report above you will see 4 new columns labeled (“0-30 days”, “31-60 days”, “61-90 days”, “91 + days”) the columns represent the aging on the claims in this particular status. In the column labeled “Claims With Status” it will give the total amount of claims in this particular status.
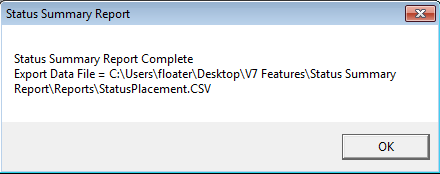
29. To retrieve your .csv report follows the path that you set for your “Output Data Directory” and look for the name that you created for your file. When you double click on it you should see your report in Excel.
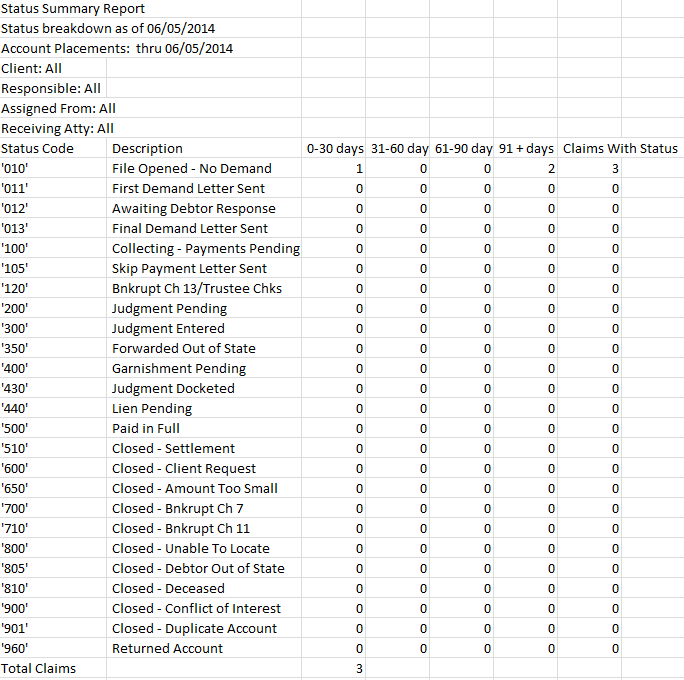
What’s New: In the .csv report above you will see 4 new columns labeled (“0-30 days”, “31-60 days”, “61-90 days”, “91 + days”) the columns represent the aging on the claims in this particular status. In the column labeled “Claims With Status” it will give the total amount of claims in this status.
30. After reviewing your reports, go back to CollectMax and close any open reports and select the button. It will return you to the main screen of CollectMax.