MaxUpdaterPlus is an optional add-on module for the MaxUpdater that allow you to post transactions in batch. ADJDB, PRIN, CCB, FEE, OTHER, CEX, COST, NRC and PMT are available to do by batch.
Multiple Transactions can be posted per row including multiple of the same transaction. The transactions are posted in date order. If no date is included for import, the process will import the date as today's date. If there are multiple transactions for the same account with the same date, the process will import the transactions in this order . When INT is added, this order will be updated.
Transactions with a Zero Amount will not be posted.
If the total Transactions that take a portion of the balance to a negative, no transaction will not be posted.
If any field on the row gets an error, none of the transactions will post.
All transactions posted using something other than a reference number or claim ordinal will post on the 001 claim.
All other fields can be updated with the same file including transactions and will be posted before the transactions. This is important to note particularly when posting a judgment. This means all transactions will be posted post judgment.
Please see MaxUpdater for information on setting up and template and the settings and options.
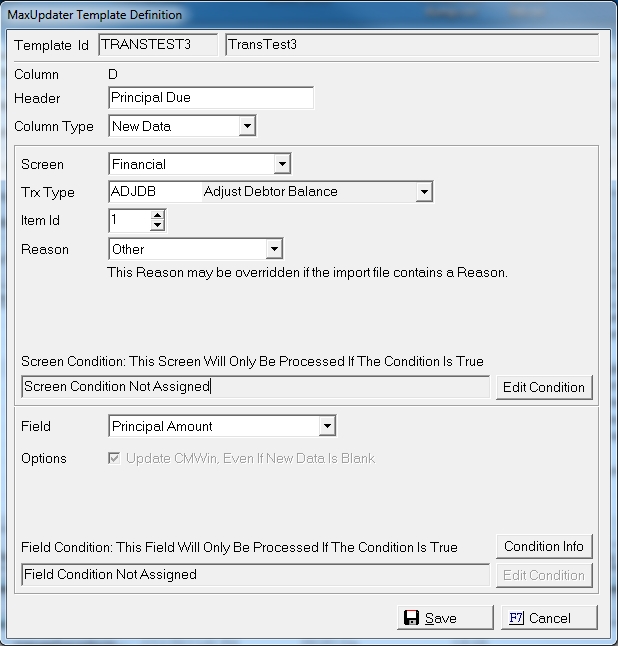
In the MaxUpdaterPlus template creator, select the Financial screen and ADJDB to translate the data in the column to a ADJDB transaction. Users may have as many columns of ADJDB transactions as needed. However in doing so, they must associate all the fields for each action using the Item ID.
If this is ADJDB transaction number one to be added to the account, select Item ID 1 and then for each column select the ADJDB field this data should populate. If the field corresponds to an additional ADJDB Transaction use another Item ID for each piece of that transaction.
Select the Default Reason for the Adjustment. This Default Reason can be overridden by including a Reason Column within the file.
Once the Item Id is selected, select the Field from the following available fields:
Note: Remember to use a negative amount to lower the balance.
In the MaxUpdaterPlus template creator, select the Financial screen and CCB to translate the data in the column to a CCB transaction. Users may have as many columns of CCB transactions as needed. However in doing so, they must associate all the fields for each action using the Item ID.
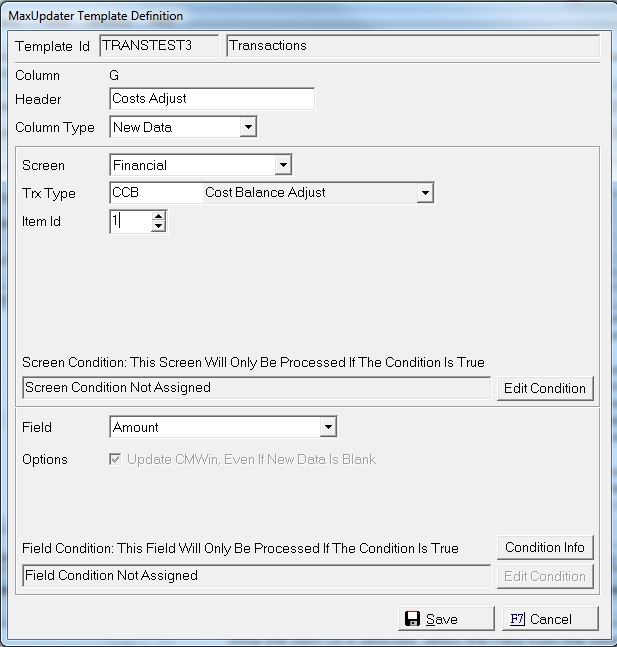
If this is CCB transaction number one to be added to the account, select Item ID 1 and then for each column select the CCB field the data in the column should populate. If the field corresponds to an additional CCB Transaction use another Item ID for each piece of that transaction.
Once the Item Id is selected, select the Field from the following available fields:
Note: Remember to use a Negative Number to lower the balance.
In the MaxUpdaterPlus template creator, select the Financial screen and CEX to translate the data in the column to a CEX transaction. Users may have as many columns of CEX transactions as needed. However in doing so, they must associate all the fields for each action using the Item ID.
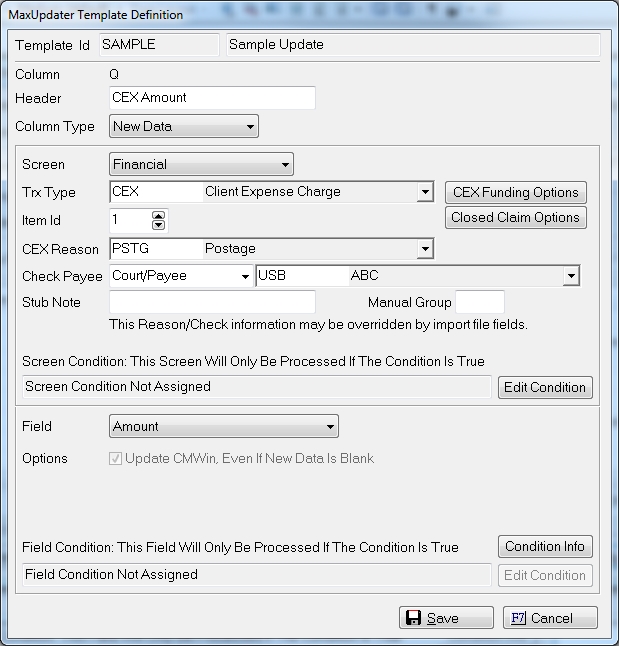
If this is CEX transaction number one to be added to the account, select Item ID 1 and then for each column select the CEX field the data in the column should populate. If the field corresponds to an additional CEX Transaction use another Item ID for each piece of that transaction.
Because CEX transactions can be funded from multiple sources, the user must tell us how they want them funded. Click the  button, to display the Cost Funding Preferences Screen.
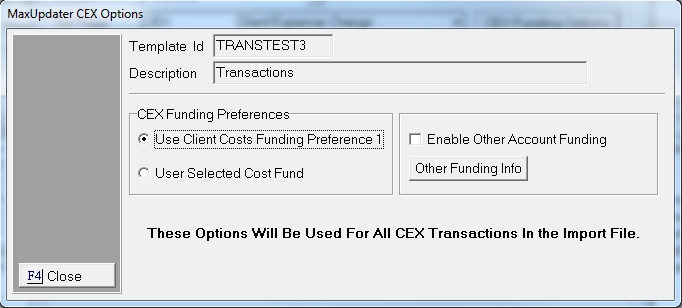
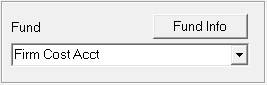
Choose between the following two funding options: Use Client Costs Funding Preferences 1 or User Selected Cost Fund. If there are not enough funds in the funding source/sources, MaxUpdaterPlus will not post the COST and will create an exception on the import report.
Note: The MaxUpdaterPlus preview import report does not check fund availabilities or proper funding sources because COST transactions and Client Setting changes can be posted between the preview and final. In the MaxUpdaterPlus template creator, select the Financial screen and
This option will use the first Funding preference set in the Client Settings under the Cost Button for Costs/CEX funding preferences. Click the  button next to Use Client Cost Funding Preferences to select this option.
To have the import process roll to the next accounts listed in the Funding Preferences, click the  box next to the Enable Other Account Funding option.

Note: Use this option, if you are unsure if you have enough funds in the primary funding source to post all the CEXs. This option most closely represents the manual posting of CEXs transactions.
The MaxUpdaterPlus checks the account balances before each transaction and posts accordingly. It is possible to have multiple costs post to the same account with multiple funding sources if you use this option.
Click the Close button to set the funding preference.
You are attempting to post a file with 3 different Costs to the same Client whose setting are set to fund from debtor payments, then from Client Cost Fund and finally advance them from the Firm.
Debtor Payments: $20
Client Cost Fund: $50
Firm Operating: Unlimited
CEX 1: $10
CEX 2: $20
CEX 3: $5
In this example, the process will post CEX 1 from Debtor Payments thus lowering the trust monies to $10. For CEX 2 will not be funded because there are insufficient funds in the Trust. CEX 3 will be posted from the Debtor payment funds in the Trust account.
In the example listed above, the MaxUpdaterPlus will post the CEXs a follows:
CEX 1 will be funded from the Debtor Payments in the Trust account. CEX 2 will be funded from the Client Cost Account since there are insufficient debtor payment funds available in the Trust. CEX 3 will be funded from the debtor payment funds.
This option will use a user selected funding source. Click the button next to User Selected Cost Fund to select this option.
Select the Funding preference from the  list.
list.
Select from the following options:
If selecting a type of account that the Client does not have available, the Cost Charge will not be posted and will appear on the exceptions report.
Note: This option should be used to override the Client Setup or to post a cost without requesting a check with the no check charge only option.
Click the  button to set the funding preference.
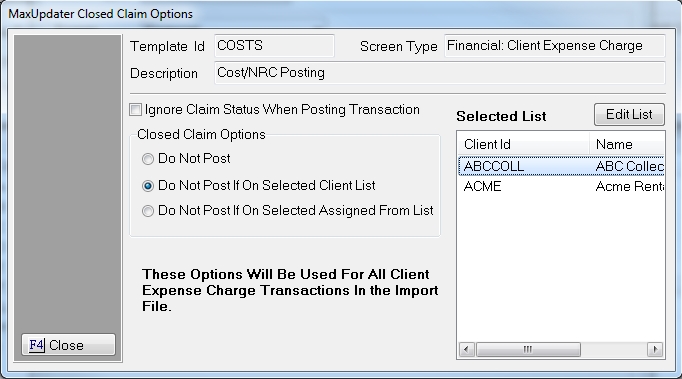
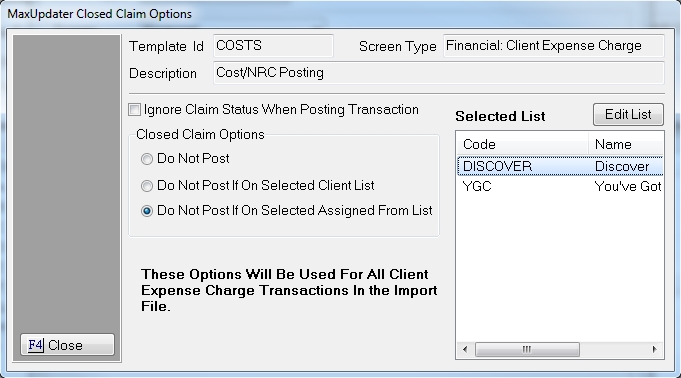
The Closed Claim options will allow you to determine if you want to post client expense charges to closed claims. Click the  to set the posting options.
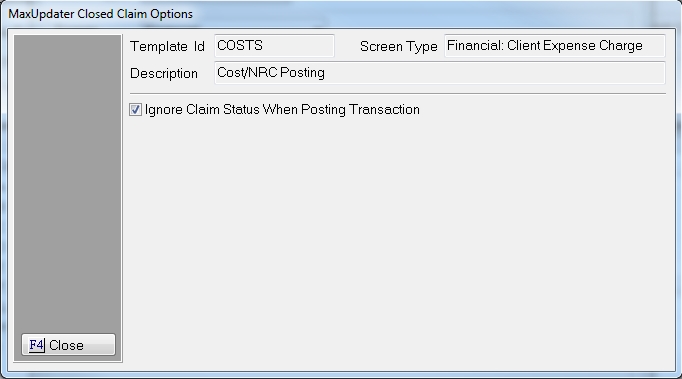
By Default the option will be set to post CEXs no matter the Claim Status. To override this setting and stop CEX transactions from posting for closed claims, or by Client ID or Assigned From, uncheck the box next to the Ignore Claim Status When Posting Transaction Selection. To display the Closed Claim Override Settings.
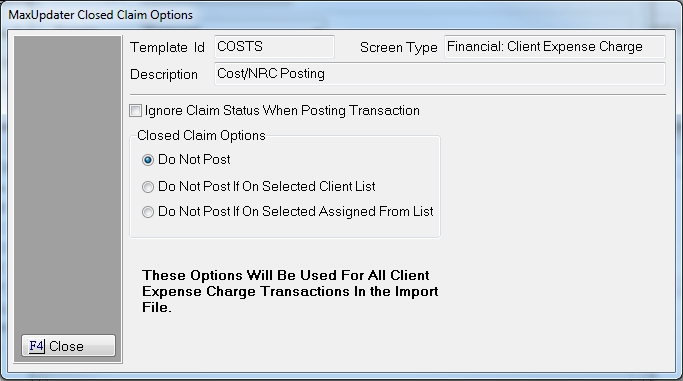
Do Not Post
Select the button next to Do Not Post, if you would like to keep the MaxUpdaterPlus from posting a CEX on a Closed Claim. A exception will be listed on the accounts that were not posted because of a Closed Claim Status.
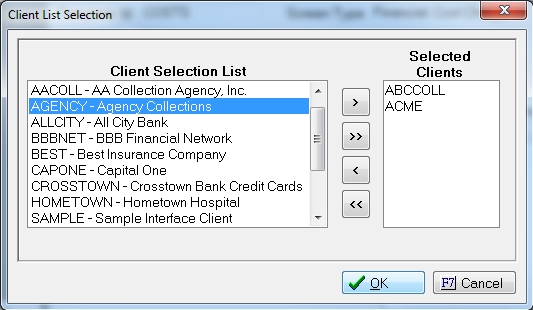
Do Not Post If On Selected Client
Select the button next to Do Not Post If On Selected Client, if you would like the CEX to post regardless of Claim Status on all accounts except the ones with the selected clients. Any Account attached to the selected client(s) will not post a CEX transaction if the Claim is Closed but will post CEX transactions on closed account for other Clients.
To select the client, click on the client in the Client Selection List and click the  button to move it to the Selected Clients List. Continue until all clients have been selected. To Remove a Client ID from the selected list, click the
  button and move the client back to the Client Selection List. To move all Client to the Selected List, click the
  button. To remove all Client Ids from the selected list, click the
  button.
Click the  button to set the list.
To Edit the selected Client List, click the  to display the Client Selection Screen above.
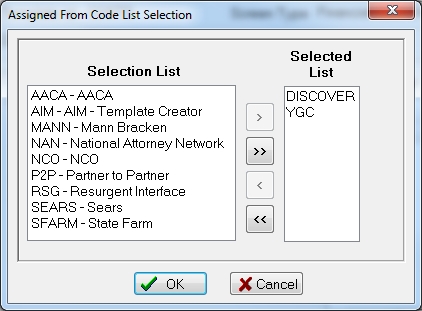
Do Not Post If On Selected Assigned From List
Select the button next to Do Not Post If On Selected Assigned From List if you want to post CEXs regardless of Claim Status on all accounts except the ones with the selected Assigned Froms. Any Account attached to the selected Assigned From/Interfaces will not post a CEX transaction if the Claim is Closed but will post CEX transactions on closed account for other Assigned Froms/Interfaces.
To select the Assigned From, click on the Assigned From/Interface in the Selection List and click the button to move it to the Selected List. Continue until all Assigned Froms/Interfaces have been selected. To Remove an Assigned From from the selected list, click the button and move the client back to the Selection List. To move all Assigned Froms/Interfaces to the Selected List, click the button. To remove all Assigned Froms/Interfaces from the selected list, click the button.
Click the button to set the list.
To Edit the selected Assigned From List, click the to display the Assigned From Selection Screen above.
Once you have selected the proper Closed Claim Options, click the button.
Defaults
Once the Item Id is selected, select the Field from the following available fields:
In the MaxUpdaterPlus template creator, select the Financial screen and Cost Charge.

Because Costs can be funded from multiple sources, the user must tell us how they want them funded. Click the  button, to display the Cost Funding Preferences Screen.

Choose between the following two funding options: Use Client Costs Funding Preferences 1 or User Selected Cost Fund. If there are not enough funds in the funding source/sources, MaxUpdaterPlus will not post the COST and will create an exception on the import report.
Note: The MaxUpdaterPlus preview import report does not check fund availabilities or proper funding sources because COST transactions and Client Setting changes can be posted between the preview and final. In the MaxUpdaterPlus template creator, select the Financial screen and
This option will use the first Funding preference set in the Client Settings under the Cost Button for Costs/CEX funding preferences. Click the button next to Use Client Cost Funding Preferences to select this option.
To have the import process roll to the next accounts listed in the Funding Preferences, click the box next to the Enable Other Account Funding option.
Note: Use this option, if you are unsure if you have enough funds in the primary funding source to post all the costs. This option most closely represents the manual posting of costs transactions.
The MaxUpdaterPlus checks the account balances before each transaction and posts accordingly. It is possible to have multiple costs post to the same account with multiple funding sources if you use this option.
Click the Close button to set the funding preference.
For Example
You are attempting to post a file with 3 different Costs to the same Client whose setting are set to fund from debtor payments, then from Client Cost Fund and finally advance them from the Firm.
Debtor Payments: $20
Client Cost Fund: $50
Firm Operating: Unlimited
Cost 1: $10
Cost 2: $20
Cost 3: $5
In this example, the process will post Cost 1 from Debtor Payments thus lowering the trust monies to $10. For cost 2 will not be funded because there are insufficient funds in the Trust. Cost 3 will be posted from the Debtor payment funds in the Trust account.
In the example listed above, the MaxUpdaterPlus will post the costs a follows:
Cost 1 will be funded from the Debtor Payments in the Trust account. Cost 2 will be funded from the Client Cost Account since there are insufficient debtor payment funds available in the Trust. Cost 3 will be funded from the debtor payment funds.
This option will use a user selected funding source. Click the button next to User Selected Cost Fund to select this option.
Select the Funding preference from the list.
Select from the following options:
If selecting a type of account that the Client does not have available, the Cost Charge will not be posted and will appear on the exceptions report.
Note: This option should be used to override the Client Setup or to post a cost without requesting a check with the no check charge only option.
Click the button to set the funding preference.
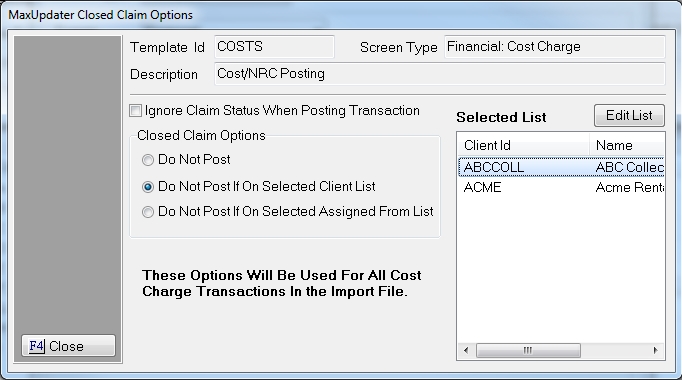
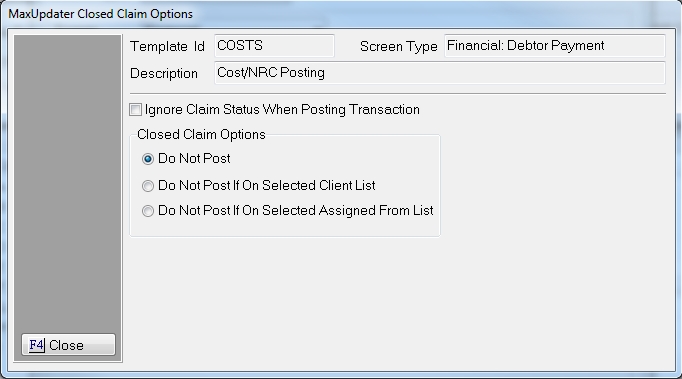
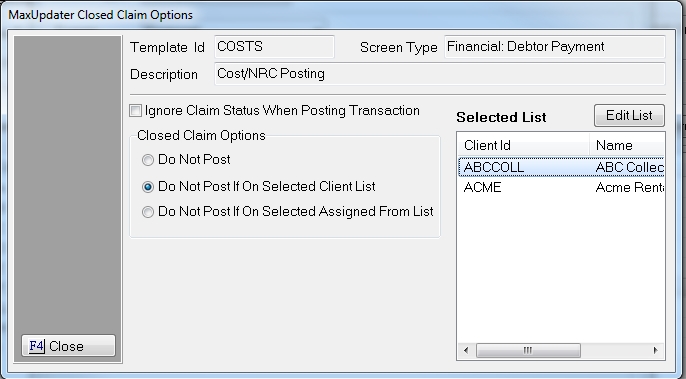
The Closed Claim options will allow you to determine if you want to post costs to closed claims. Click the to set the posting options.

By Default the option will be set to post Costs no matter the Claim Status. To override this setting and stop Costs from posting for closed claims, or by Client ID or Assigned From, uncheck the box next to the Claim Status When Posting Transaction Selection. To display the Closed Claim Override Settings.

Do Not Post
Select the button next to Do Not Post, if you would like to keep the MaxUpdaterPlus from posting a Cost on a Closed Claim. A exception will be listed on the accounts that were not posted because of a Closed Claim Status.
Do Not Post If On Selected Client
Select the button next to Do Not Post If On Selected Client, if you would like the Costs to post regardless of Claim Status on all accounts except the ones with the selected clients. Any Account attached to the selected client(s) will not post a cost transaction if the Claim is Closed but will post costs on closed account for other Clients.
To select the client, click on the client in the Client Selection List and click the button to move it to the Selected Clients List. Continue until all clients have been selected. To Remove a Client ID from the selected list, click the button and move the client back to the Client Selection List. To move all Client to the Selected List, click the button. To remove all Client Ids from the selected list, click the button.
Click the button to set the list.
To Edit the selected Client List, click the to display the Client Selection Screen above.
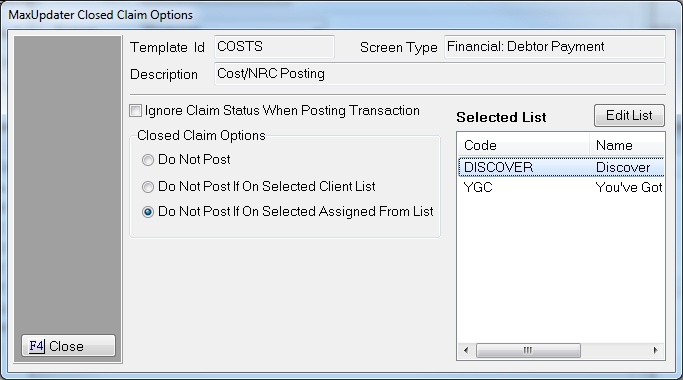
Do Not Post If On Selected Assigned From List
Select the button next to Do Not Post If On Selected Assigned From List if you want Costs to post regardless of Claim Status on all accounts except the ones with the selected Assigned Froms. Any Account attached to the selected Assigned From/Interfaces will not post a cost transaction if the Claim is Closed but will post costs on closed account for other Assigned Froms/Interfaces.
To select the Assigned From, click on the Assigned From/Interface in the Selection List and click the button to move it to the Selected List. Continue until all Assigned Froms/Interfaces have been selected. To Remove an Assigned From from the selected list, click the button and move the client back to the Selection List. To move all Assigned Froms/Interfaces to the Selected List, click the button. To remove all Assigned Froms/Interfaces from the selected list, click the button.
Click the button to set the list.
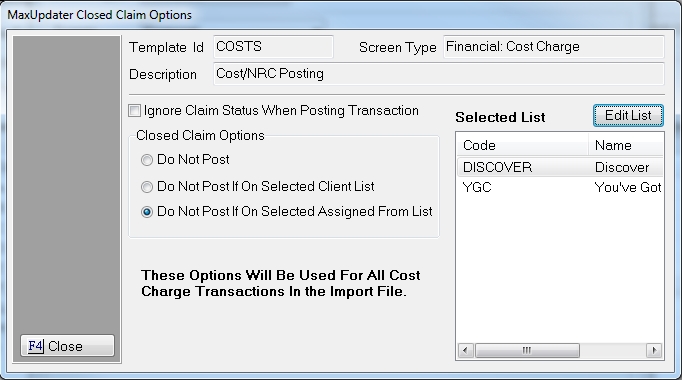
To Edit the selected Assigned From List, click the to display the Assigned From Selection Screen above.
Once you have selected the proper Closed Claim Options, click the button.
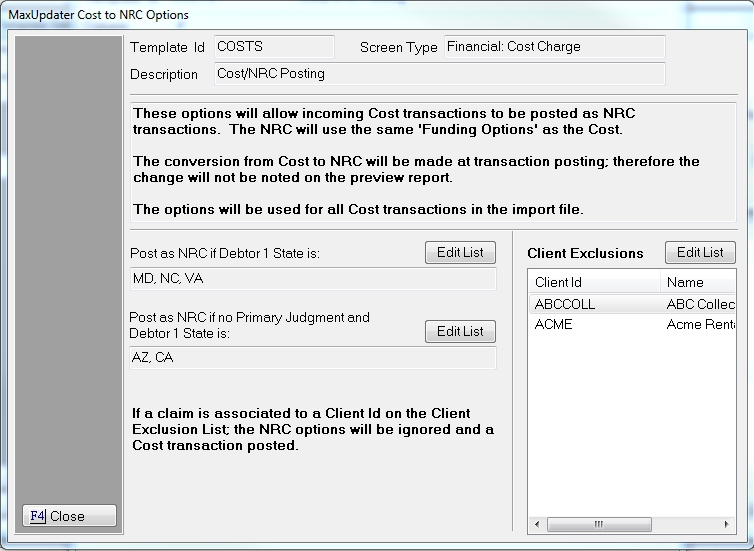
The MaxUpdaterPlus allows you to Post an NRC instead of a COST Charge if the account meets certain set criteria such as State and Legal Stage. Also the module allows you to override the set criteria for selected Client IDs.
To set the COST to NRC options, click the  button.
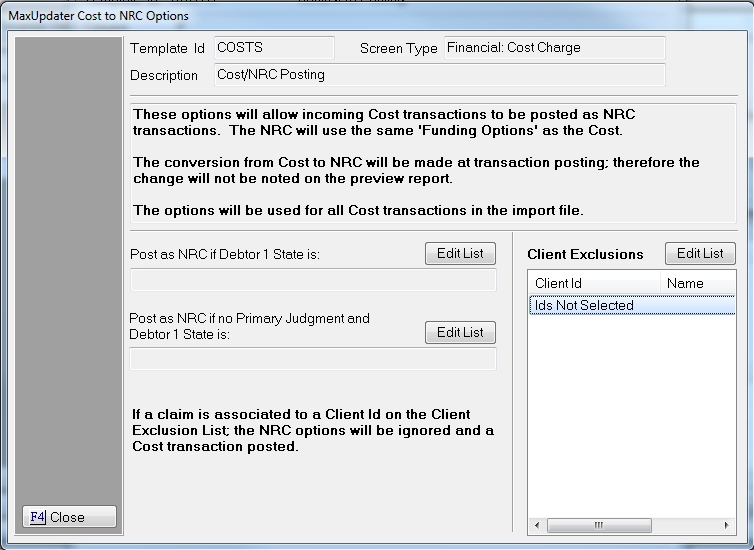
All Cost Transactions in the file will post as a COST unless you select to use one of the following options:
Post as NRC if Debtor 1 State is
Add the States to this Option, if you want to post NRCs instead of COSTs for accounts whose primary debtor resides in the selected state regardless of legal status. Click the button to select the States.
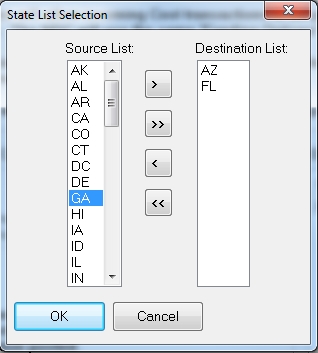
To select the State, click on the State in the Source List and click the button to move it to the Destination List. Continue until all States have been selected. To Remove a State from the Destination list, click the button and move the State back to the Selection List. To move all States to the Destination List, click the button. To remove all States from the Destination List, click the button.
Click the  button to set the Destination List.

Post as NRC if No Primary JMT and Debtor 1 State is
Add States to the Option, if you if you want to post NRCs instead of COSTs for accounts whose primary debtor resides in the selected state and there is no primary judgment on the main claim or the selected claim if using a claim look up. Click the button to select the States.
To select the State, click on the State in the Source List and click the button to move it to the Destination List. Continue until all States have been selected. To Remove a State from the Destination list, click the button and move the State back to the Selection List. To move all States to the Destination List, click the button. To remove all States from the Destination List, click the button.
Click the button to set the Destination List.
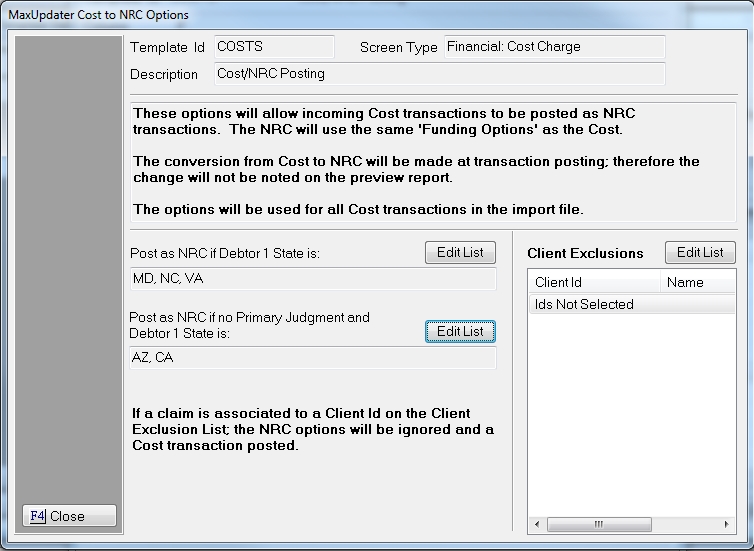
Client Exclusions
To exclude Clients from posting NRCs instead of COSTs by the selected debtor stage and/or legal state, click the button next to Client Exclusions.
To select the client, click on the client in the Client Selection List and click the button to move it to the Selected Clients List. Continue until all clients have been selected. To Remove a Client ID from the selected list, click the button and move the client back to the Client Selection List. To move all Client to the Selected List, click the button. To remove all Client Ids from the selected list, click the button.
Click the button to set the list.
Note: If you select to exclude a Client. Any accounts associated with that Client ID will have COST transactions posted regardless of State or Legal Stage.
Click the to set the COST to NRC options.
The Item ID is used to link the fields to a single cost charge. Since multiple costs can be posted within a row, the user will need to indicate which fields belong to each cost by using the same like Item Id for the cost.

Select the Cost Reason from the list. This option can be overridden by a field within the file itself but must be set incase there is a blank in the file.

The check options will only appear for users who have check writing and if they have not chosen to use No Check Charge Only as a funding preference. These are default settings and may be overridden by fields in the file but must be set incase there are blank fields in the import.
Select the Payee Type from the list. If selecting Court/Payee, select the payee from the list.

If selecting Free Text, enter the Payee Name in the next Field.

Enter any default Stub Note. This will be printed on the Check Stub

This is not required to be entered as a default value and can be overridden by a field in the file.
Enter a Manual Group Code. This will be used to group the checks manually instead of using the Payee grouping options.

Note: MaxUpdaterPlus will respect the Court/Payee check grouping options. Manual grouping overrides this setting.
This is not required to be entered as a default value and can be overridden by a field in the file.
Click the button and select the field for each column.
Click the  button to save the column definition.
You can post multiple transactions per row. The transactions will be posted in Date order. If all the transactions are the same date, the MaxUpdaterPlus will post them in ADJDB, PRIN, CCB, FEE, OTHER, COST and PMT order.
Cost Funding Settings are for the entire spreadsheet. If different funding options are needed, a different file should be created for each funding source.
MaxConditions applies to all Transactions in the row.
MaxUpdaterPlus has a Payee and Cost Reason Translation Table so that values can be translated into a CollectMax Code.
MaxUpdaterPlus does not review funds or accounts in the preview.
MaxUpdaterPlus will list the Account with Insufficient funds to post a cost.
In the MaxUpdaterPlus template creator, select the Financial screen and FEE to translate the data in the column to a FEE transaction. Users may have as many columns of FEE transactions as needed. However in doing so, they must associate all the fields for each action using the Item ID.
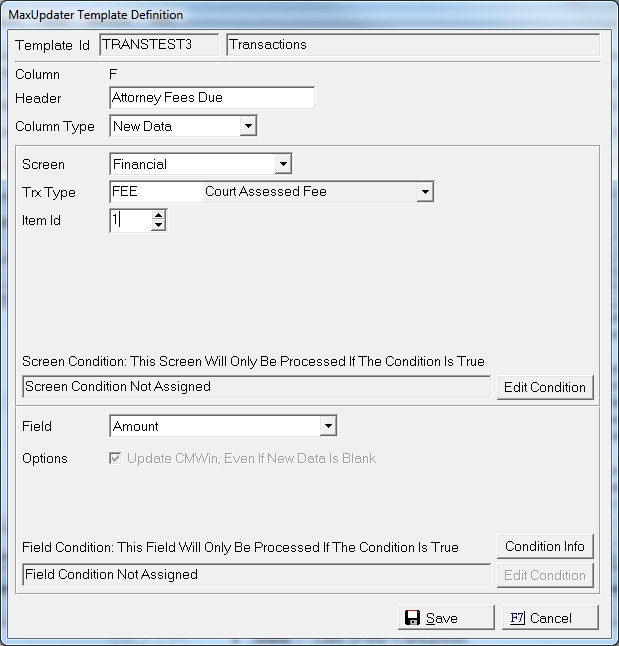
If this is FEE transaction number one to be added to the account, select Item ID 1 and then for each column select the FEE field the data in the column should populate. If the field corresponds to an additional FEE Transaction use another Item ID for each piece of that transaction.
Once the Item Id is selected, select the Field from the following available fields:
Note: Remember to use a Negative Number to lower the balance.
You can post multiple transactions per row. The transactions will be posted in Date order. If all the transactions are the same date, the MaxUpdaterPlus will post them in ADJDB, PRIN, CCB, FEE, OTHER, COST, NRC, NRCADJ and PMT order.
NRC Funding Settings are for the entire spreadsheet. If different funding options are needed, a different file should be created for each funding source.
MaxConditions applies to all Transactions in the row.
MaxUpdaterPlus has a Payee and NRC Reason Translation Table so that values can be translated into a CollectMax Code.
MaxUpdaterPlus does not review funds or accounts in the preview.
MaxUpdaterPlus will list the Account with Insufficient funds to post a NRC.
In the MaxUpdaterPlus template creator, select the Financial screen and Non-Recoverable Costs - NRC.
Note: If you have a mixture of COST and NRC transaction in your file, you can choose to process the file as a COST transaction file and use the COST to NRC Options to select the accounts that should have an NRC instead of a Cost. See the Cost Section Above.
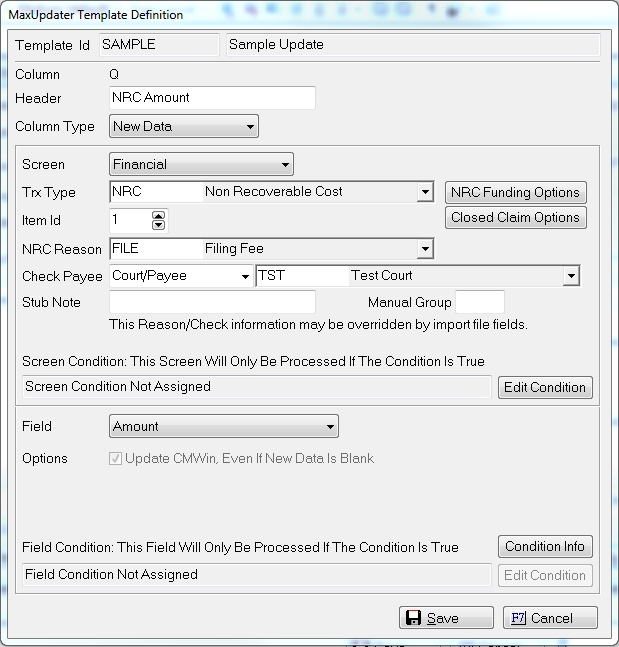
Because NRC transactions can be funded from multiple sources, the user must tell us how they want them funded. Click the  button, to display the NRC Options Screen.
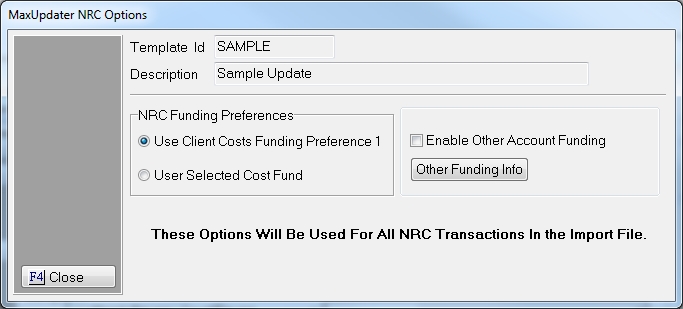
Choose between the following two funding options: Use Client NRC Funding Preferences 1 or User Selected NRC Fund. If there are not enough funds in the funding source/sources, MaxUpdaterPlus will not post the NRC and will create an exception on the import report.
Note: The MaxUpdaterPlus preview import report does not check fund availabilities or proper funding sources because NRC transactions and Client Setting changes can be posted between the preview and final. In the MaxUpdaterPlus template creator, select the Financial screen and
This option will use the first Funding preference set in the Client Settings under the Cost Button for NRC funding preferences. Click the button next to Use Client NRC Funding Preferences to select this option.
To have the import process roll to the next accounts listed in the Funding Preferences, click the box next to the Enable Other Account Funding option.
Note: Use this option, if you are unsure if you have enough funds in the primary funding source to post all the costs. This option most closely represents the manual posting of costs transactions.
The MaxUpdaterPlus checks the account balances before each transaction and posts accordingly. It is possible to have multiple costs post to the same account with multiple funding sources if you use this option.
Click the Close button to set the funding preference.
For Example
You are attempting to post a file with 3 different NRCs to the same Client whose setting are set to fund from debtor payments, then from Client Cost Fund and finally advance them from the Firm.
Debtor Payments: $20
Client Cost Fund: $50
Firm Operating: Unlimited
NRC 1: $10
NRC 2: $20
NRC 3: $5
In this example, the process will post NRC 1 from Debtor Payments thus lowering the trust monies to $10. NRC 2 will not be funded because there are insufficient funds in the Trust. NRC 3 will be posted from the Debtor payment funds in the Trust account.
In the example listed above, the MaxUpdaterPlus will post the costs a follows:
NRC 1 will be funded from the Debtor Payments in the Trust account. NRC 2 will be funded from the Client Cost Account since there are insufficient debtor payment funds available in the Trust. NRC 3 will be funded from the debtor payment funds.
This option will use a user selected funding source. Click the button next to User Selected Cost Fund to select this option.
Select the Funding preference from the list.
Select from the following options:
If selecting a type of account that the Client does not have available, the NRC transaction will not be posted and will appear on the exceptions report.
Note: This option should be used to override the Client Setup or to post a NRC without requesting a check with the no check charge only option.
Click the button to set the funding preference.
The Closed Claim options will allow you to determine if you want to post non recoverable cost charges to closed claims. Click the to set the posting options.
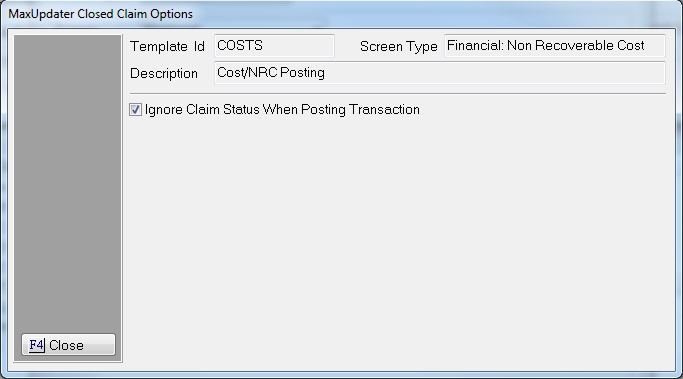
By Default the option will be set to post NRCs no matter the Claim Status. To override this setting and stop NRC transactions from posting for closed claims, or by Client ID or Assigned From, uncheck the box next to the Ignore Claim Status When Posting Transaction Selection. To display the Closed Claim Override Settings.
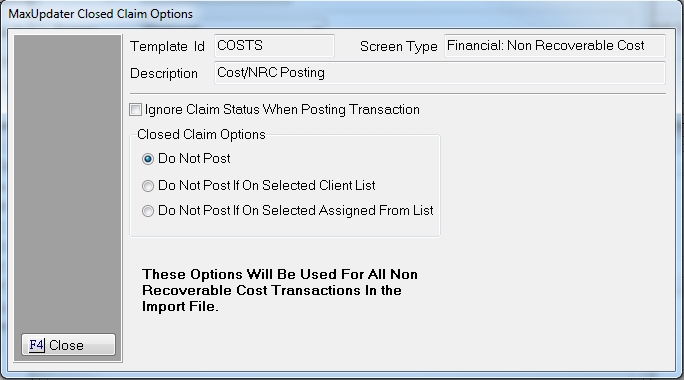
Do Not Post
Select the button next to Do Not Post, if you would like to keep the MaxUpdaterPlus from posting a NRC on a Closed Claim. A exception will be listed on the accounts that were not posted because of a Closed Claim Status.
Do Not Post If On Selected Client
Select the button next to Do Not Post If On Selected Client, if you would like the NRC to post regardless of Claim Status on all accounts except the ones with the selected clients. Any Account attached to the selected client(s) will not post a NRC transaction if the Claim is Closed but will post NRC transactions on closed account for other Clients.
To select the client, click on the client in the Client Selection List and click the button to move it to the Selected Clients List. Continue until all clients have been selected. To Remove a Client ID from the selected list, click the button and move the client back to the Client Selection List. To move all Client to the Selected List, click the button. To remove all Client Ids from the selected list, click the button.
Click the button to set the list.
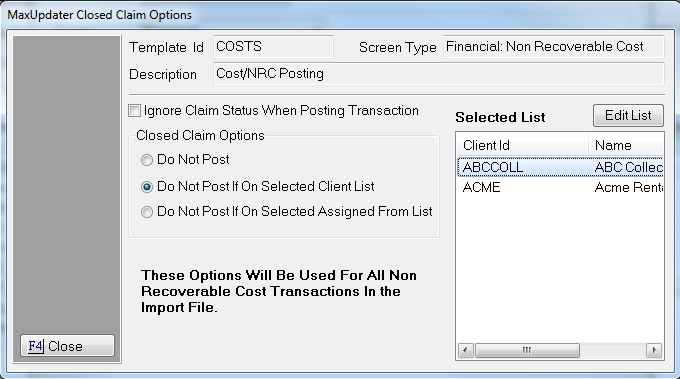
To Edit the selected Client List, click the to display the Client Selection Screen above.
Do Not Post If On Selecte Assigned From List
Select the button next to Do Not Post If On Selected Assigned From List if you want to post NRCs regardless of Claim Status on all accounts except the ones with the selected Assigned Froms. Any Account attached to the selected Assigned From/Interfaces will not post a NRC transaction if the Claim is Closed but will post NRC transactions on closed account for other Assigned Froms/Interfaces.
To select the Assigned From, click on the Assigned From/Interface in the Selection List and click the button to move it to the Selected List. Continue until all Assigned Froms/Interfaces have been selected. To Remove an Assigned From from the selected list, click the button and move the client back to the Selection List. To move all Assigned Froms/Interfaces to the Selected List, click the button. To remove all Assigned Froms/Interfaces from the selected list, click the button.
Click the button to set the list.
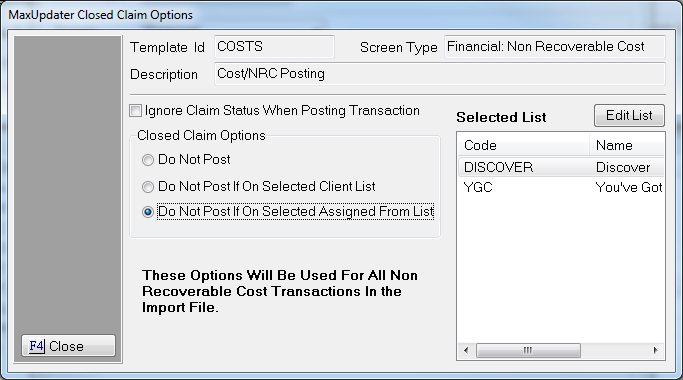
To Edit the selected Assigned From List, click the to display the Assigned From Selection Screen above.
Once you have selected the proper Closed Claim Options, click the button.
The Item ID is used to link the fields to a single NRC transaction. Since multiple NRC transactions can be posted within a row, the user will need to indicate which fields belong to each NRC by using the same like Item Id for the cost.
Select the NRC Reason from the list. This option can be overridden by a field within the file itself but must be set incase there is a blank in the file.
The check options will only appear for users who have check writing and if they have not chosen to use No Check Charge Only as a funding preference. These are default settings and may be overridden by fields in the file but must be set in case there are blank fields in the import.
Select the Payee Type from the list. If selecting Court/Payee, select the payee from the list.
If selecting Free Text, enter the Payee Name in the next Field.
Enter any default Stub Note. This will be printed on the Check Stub
This is not required to be entered as a default value and can be overridden by a field in the file.
Enter a Manual Group Code. This will be used to group the checks manually instead of using the Payee grouping options.
Note: MaxUpdaterPlus will respect the Court/Payee check grouping options. Manual grouping overrides this setting.
This is not required to be entered as a default value and can be overridden by a field in the file.
Click the button and select the field for each column.
Click the button to save the column definition.
You can post multiple transactions per row. The transactions will be posted in Date order. If all the transactions are the same date, the MaxUpdaterPlus will post them in ADJDB, PRIN, CCB, FEE, OTHER, COST, NRC, NRCADJ and PMT order.
NRC Funding Settings are for the entire spreadsheet. If different funding options are needed, a different file should be created for each funding source.
MaxConditions applies to all Transactions in the row.
MaxUpdaterPlus has a Payee and NRC Reason Translation Table so that values can be translated into a CollectMax Code.
MaxUpdaterPlus does not review funds or accounts in the preview.
MaxUpdaterPlus will list the Account with Insufficient funds to post a NRC.
In the MaxUpdaterPlus template creator, select the Financial screen and NRCADJ to translate the data in the columns to a NRCADJ transaction. Users may have as many columns of NRCADJ transactions as needed. However in doing so, they must associate all the fields for each action using the Item ID. Only Adjustment to the NRC Amounts and COST Amounts can be done with this Transaction. If you need to adjust other balance components use an ADJDB Transaction.
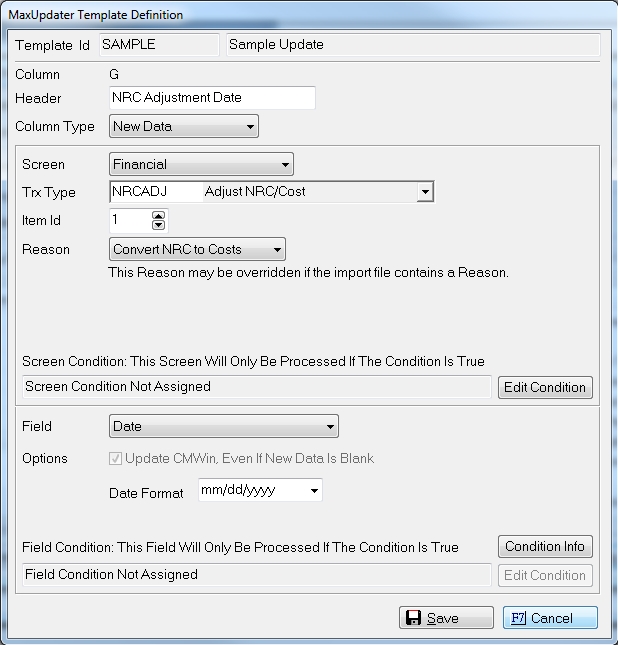
If this is NRCADJ transaction number one to be added to the account, select Item ID 1 and then for each column select the NRCADJ field this data should populate. If the field corresponds to an additional ADJDB Transaction use another Item ID for each piece of that transaction.
Select the Default Reason for the Adjustment. This Default Reason can be overridden by including a Reason Column within the file.
Once the Item Id is selected, select the Field from the following available fields:
Note: Remember to use a negative amount to lower the balance.
In the MaxUpdaterPlus template creator, select the Financial screen and PMT
The following are a list of limitations and rules when posting PMT transactions with the MaxUpdaterPlus
When adding payments to the Template, select Financial and PMT.

To set the SIF/PIF settings click the  button.

SIF/PIF: The payment process will use the Client Settings options. To override those settings, uncheck the Use Client Settings button and select the new status and/or new action to be added for PIF and/or SIF payments.
Default Payment Method: A default payment method must be selected but can be overridden by a payment method column in the data file.
Select Hold Interest Settings: Yes will hold interest regardless of client settings and Client settings will us these settings to hold interest.
Overpayments: The process automatically allows overpayments to an account. Check the box, to disallow overpayments. The payment will be listed to the exceptions report.
Payment Acknowledgment Letter: Select to use the client payment acknowledgment settings.
Include on Deposit: Check to include in next deposit.
The Closed Claim options will allow you to determine if you want to post payments to closed claims. Click the to set the posting options.

By Default the option will be set to post Payments no matter the Claim Status. To override this setting and stop PMT transactions from posting for closed claims, or by Client ID or Assigned From, uncheck the box next to the Ignore Claim Status When Posting Transaction Selection. To display the Closed Claim Override Settings.
Do Not Post
Select the button next to Do Not Post, if you would like to keep the MaxUpdaterPlus from posting a PMT on a Closed Claim. A exception will be listed on the accounts that were not posted because of a Closed Claim Status.
Do Not Post If On Selected Client
Select the button next to Do Not Post If On Selected Client, if you would like the PMT to post regardless of Claim Status on all accounts except the ones with the selected clients. Any Account attached to the selected client(s) will not post a PMT transaction if the Claim is Closed but will post PMT transactions on closed account for other Clients.
To select the client, click on the client in the Client Selection List and click the button to move it to the Selected Clients List. Continue until all clients have been selected. To Remove a Client ID from the selected list, click the button and move the client back to the Client Selection List. To move all Client to the Selected List, click the button. To remove all Client Ids from the selected list, click the button.
Click the button to set the list.
To Edit the selected Client List, click the to display the Client Selection Screen above.
Do Not Post If On Selected Assigned From List
Select the button next to Do Not Post If On Selected Assigned From List if you want to post Payments regardless of Claim Status on all accounts except the ones with the selected Assigned Froms. Any Account attached to the selected Assigned From/Interfaces will not post a PMT transaction if the Claim is Closed but will post PMT transactions on closed account for other Assigned Froms/Interfaces.
To select the Assigned From, click on the Assigned From/Interface in the Selection List and click the button to move it to the Selected List. Continue until all Assigned Froms/Interfaces have been selected. To Remove an Assigned From from the selected list, click the button and move the client back to the Selection List. To move all Assigned Froms/Interfaces to the Selected List, click the button. To remove all Assigned Froms/Interfaces from the selected list, click the button.
Click the button to set the list.
To Edit the selected Assigned From List, click the to display the Assigned From Selection Screen above.
Once you have selected the proper Closed Claim Options, click the button.
The process will post payments using the account's current payment allocations. However, if the user has the payment split into payment into balance segments to be posted as one payment on the account.
The final report will have and additional tab called Payment Notifications.
This report will list accounts Paid In Full, Settled In Full, Over Paid and payments posted without advancing a payment plan.
In the MaxUpdaterPlus template creator, select the Financial screen and OTHER to translate the data in the column to a OTHER transaction. Users may have as many columns of OTHER transactions as needed. However in doing so, they must associate all the fields for each action using the Item ID.

If this is OTHER transaction number one to be added to the account, select Item ID 1 and then for each column select the OTHER field the data in the column should populate. If the field corresponds to an additional OTHER Transaction use another Item ID for each piece of that transaction.
Once the Item Id is selected, select the Field from the following available fields:
Note: Remember to use a Negative Number to lower the balances.
The MaxUpdaterPlus can now be automated to run throughout the day without having to use the task scheduler in Windows.
See MaxUpdaterPlus Automation for more information.