MaxExtract
This feature adds the ability to extract more data, such as History Notes, Action Codes and Transactions, more efficiently than the Simple Data Extraction.
Setting the Defaults
From the Main Screen of CollectMax, click the  button to display the Network Processes Screen.
Select the  tab and double-click or click the
  button to display the MaxExtract Interface.
Before using the MaxExtract Interface, you may want to set the template defaults as a shortcut on installed templates tab. Any of these settings can be overridden at the template level.
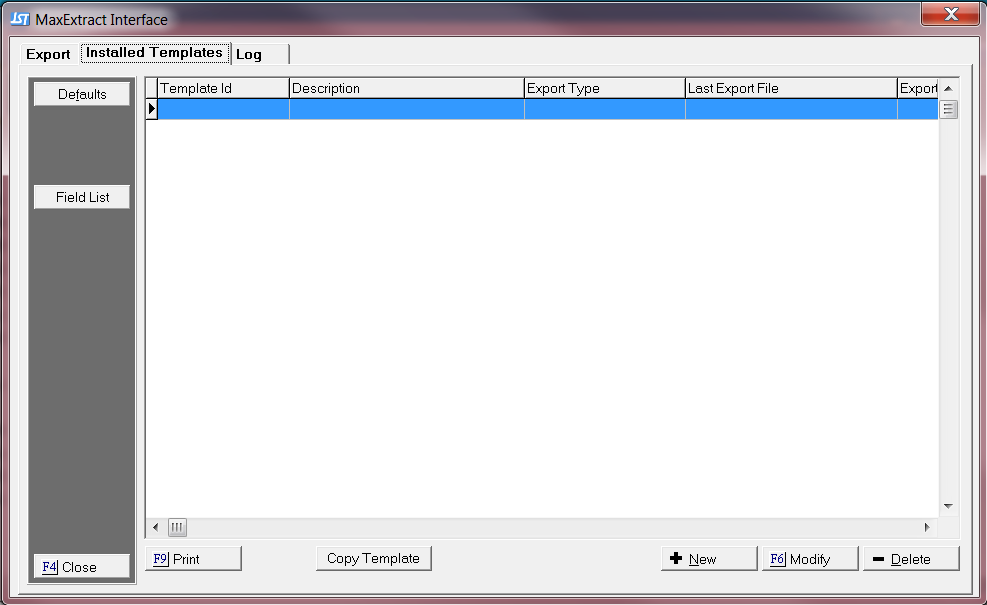
Select the  tab to display the MaxExtract Installed Templates Screen.
Click the  button to display the MaxExtract Template Defaults Screen.

Set the following options as Defaults:
- Base export Directory: Set a Default export Directory. Click the
 and select the proper directory location on the network.
Creating a Template
MaxExtract requires you setup a template the corresponds with the file to be exported. You can create a different template each time you export a new file or you can setup one template and make your export files conform to the created template.
Click the tab to display the Installed Templates screen.
On this screen a list of the current templates will be displayed. From this screen, a user can set the defaults, add a new template, modify and existing template, copy a template, delete an existing template or print a list of available fields.
Click the  button to create a new template.
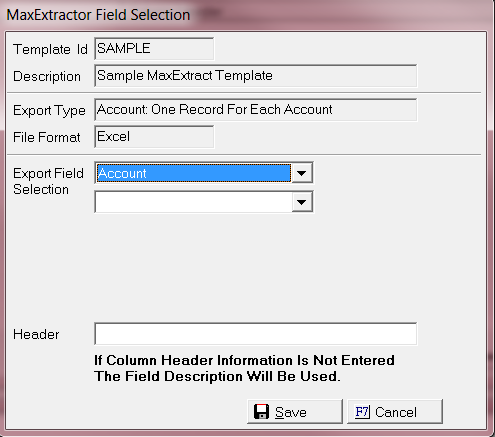
Each Template will require a unique Template ID. The Template ID will be used for identification of the template when exporting or in the download information added to the debtor history.
A Description is optional but is useful when better defining the Template ID.

If the Template was an existing template, the upper right hand corner will list statistical information regarding the creation and use of this template.

Select your export Type. An export type must be selected before assigning export Fields.

Select the export Type formats. Select from the following options:
- Account: One record for Each Account.
- Claim List:One record for each claim.
- Debtor: Each claim Debtor Template.
- History: One record for each history note.
- Transaction: Transaction Template.
Select the format of file that this template will use. Select from Excel (which includes XLS, XLSX), Comma Delimited (CSV), and (DBF).

Select the File Formats. Select from the following file Formats:
Check the Box next to any of the following that apply:
- Include Header Record: The export file will have a Header Row.
Each column of Data in the export file must be defined in order for the export process to work properly.
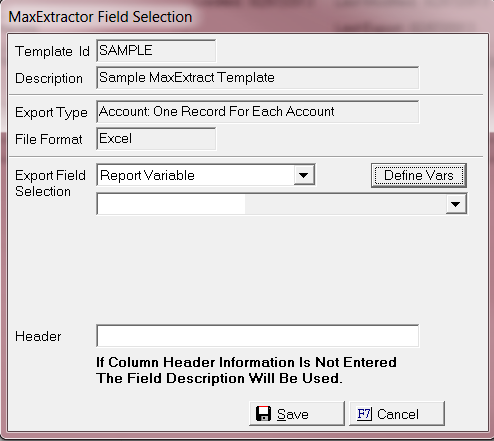
Click the  button to add a column.
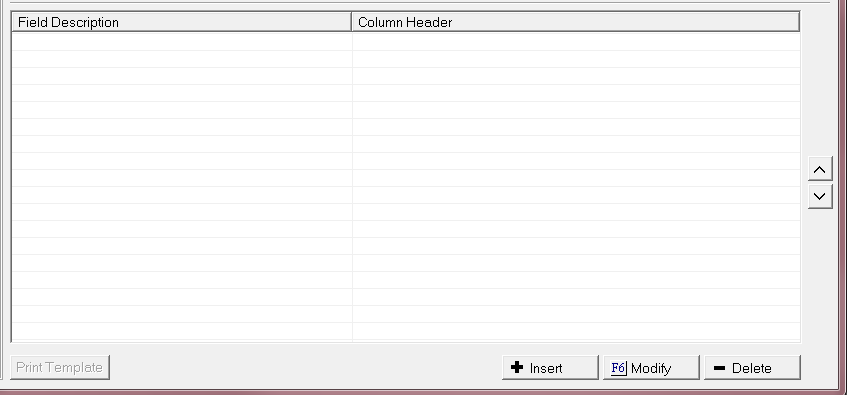
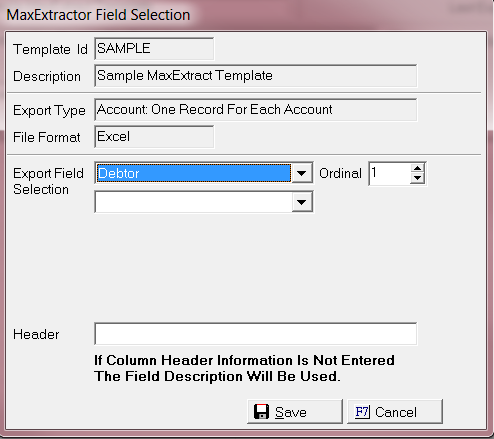
This screen should then pull up . Select your Export Field Selection by using the  .
.
Account Selections
If you select the Export Field Selection for "Account". The following options are available:
- Account Balance: This will export the account balance.
- Account Key: PKAroot.
- Account Memo: The account memo.
- Account Number: Debtor Account Number.
- Account Type: This will display the Account Type.
- Action: This will list the Account Actions.
- Assigned From: Assigned From on the Summary Tab of an account.
- Client: The Client found on the account.
- Do Not Contact: It will show the Do Not Contact information on the account.
- Firm ID: Firm ID on the Summary Tab of an account.
- Flash Message: The account Flash message .
- Forwarder ID: Forwarder ID on the Summary Tab of an account.
- Link: It will provide the Linked information on the account.
- Link Balance: It will provide the linked balance information.
- Network Balance: It will display the Network Balance.
- Original Creditor: It provides the Original Creditor.
- Originator: Originator information on the Account.
- Other Account Number: Other Account Number information on the Account.
- Payment Plan: Payment Plan information on the Account.
- Placement To: Placement To information on the Account.
- Receiving Attorney: Receiving Attorney Information on the Account.
- Responsible: Responsible Information on the Account.
- User Field: Account level User Field Information.
Note: If you check the box for adding a header column. If you leave the header section empty on this screen the field description will be used instead.
Claim Selections
If you select the Export Field Selection for "Claim". The following options are available:

- Action: This will list all Claim level actions.
- Activity: This will provide all claim level activities.
- Arbitration: This will provide the arbitration information.
- Bank Garnishment: This will provide all Bank Garnishment Information.
- Begin Interest Date: This will provide the Begin interest date on the claim.
- Charge off Date: This will record the Charge off Date on the Claim.
- Claim Balance: This will record the Claim Balance on the Claim.
- Claim Key: This will provide the Claim Key.
- Close Date: This will provide the Close Date.
- Commission: This will provide the Commission Date.
- Contract Date: This will display the Contract Date.
- Filing: This is the filing information.
- For: This is the For field.
- Interrogatory: This is the Interrogatory information.
- Judgment: This is the Judgment information.
- Last Interest Date: This is the Last Interest Date.
- Last Payment Amount: The Last Payment Amount.
- Last Payment Date: The Last Payment Date.
- Lien: This is the Lien information.
- Non Suit Reason: This is the Non-Suit Reason Information.
- Open Date: The Open Date.
- Plaintiff: The Plaintiff Information.
- Post Judgment Interest Rate: The Post Judgment Interest Rate.
- Pre Judgement Interest Rate: The Pre Judgment Interest Rate.
- Preferred Court: The Preferred Court Information.
Debtor Selections
If you select the Export Field Selection for "Debtor". The following options are available:
- Address 1: This is the Address 1 Field.
- Address 2: This is the Address 2 Field.
- Address Added Date: This is the Address Added Date.
- Address End Date: The Address End Date.
- Address Invalid: The Address Invalid Date.
- Address Invalid Reason: Address Invalid Reason.
- Address Is Physical Address: The Physical Address.
- Address Last Modified: The last time the Address was Modified.
- Address Notes: The Address Notes.
- Address Obtained Date: The Address Obtained Date.
- Address Source: The Address Source location.
- Address Start Date: Address Start Date.
- Address Verified Date: The address Verified Date.
- Alias-Contact: Alias Contact Information.
- Bank: The Bank Information.
- Bankruptcy: Bankruptcy Information on the account.
- Business Name 2: Business Name 2 Field.
- Cellphone: Cellphone Information.
- Cellphone Added Date: Cellphone Added Date.
- Cellphone End Date: Cellphone End Date.
- Cellphone Invalid: Cellphone Invalid field.
- Cellphone Invalid Reason: Cellphone Invalid Reason.
- Cellphone Last Modified: Cellphone Last Modified.
- Cellphone Notes: Cellphone Notes.
- Cellphone Obtained Date: Cellphone Obtained Date.
- Cellphone Source: Cellphone Source.
- Cellphone Start Date: Cellphone Start Date.
- Cellphone Verified Date: Cellphone Verified Date.
- City: The City Field information.
- County: The County information field.
- Credit Score: The Credit Score information.
- Date of Birth: Date of Birth information.
- Date of Death: Date of Death information.
- Debtor Key: Debtor Key Information.
- Driver License Number: Drivers license number.
- Email: Email Account.
- Employer: Employer Information.
- Employment Status: This is the Employment Status.
- Fax Number: This is the Fax Number.
- Fax Phone Added Date: The date Fax Number Added.
- Fax Phone End Date: The Fax Phone End Date.
- Fax Phone Invalid: The Fax Phone Invalid.
- Fax Phone Invalid Reason: The fax phone Invalid Reason.
- Fax Phone Last Modified: The last time the Fax Phone was modified.
- Fax Phone Notes: The Last Phone Notes.
- Fax Phone Obtained Date: The fax phone obtained date.
- Fax Phone Source: The fax phone source.
- Fax Phone Start Date: The Fax Phone Start Date.
- Fax Phone Verified Date: The Date the Fax Phone was Verified.
- First Name: The First Name .
- Full Name: The Full Name.
- General Asset: The General Asset information.
- Is Business: The is Business Field .
- Language: This is the Language Field.
- Last Name Business Name 1: Last Name Business Name 1.
- Member: The Account Member on Account Name.
- Middle Name: Debtor Middle Name.
- Next Scheduled Payment: The Next Scheduled Payment.
- Payment Plan: The Payment Plan Information.
- Phone: The Phone Information.
- Phone Added Date: The Date the Phone was Added.
- Phone End Date: The Phone End date.
- Phone Extension: The Phone Extension.
- Phone Invalid: The Phone Invalid Field.
- Phone Invalid Reason: The Phone Invalid Reason.
- Phone Last Modified: The Last Modified Phone Number.
- Phone Notes: The Phone Notes on the Account.
- Phone Obtained Date: The Phone Obtained Date.
- Phone Source: The Phone source field.
- Phone Start Date: The Phone Start Date.
- Phone Verified Date: The last date the Phone was Verified.
- Probate: The Probate Information.
- Property: The Property Information.
- Salutation: The Salutation information.
- SSN-EIN: SSN or EIN information.
- State: The State Field.
- Suffix: The Suffix Field Information.
- User Fields: The User Fields information on Debtor Screen.
- Vehicles: The Vehicle Information on the Screen.
- Work Phone: Work Phone Number.
- Work Phone Added Date: The date Work Phone added.
- Work Phone End Date: The end date for the Work Phone.
- Work Phone Invalid: The Work Phone Invalid.
- Work Phone Invalid Reason: The Work Phone Invalid Reason.
- Work Phone Last Modified: The Work Phone Last Modified.
- Work Phone Notes: The Work Phone Notes.
- Work Phone Obtained Date: The date the Work Phone was obtained.
- Work Phone Source: The Work Phone Source.
- Work Phone Start Date: The Work Phone Start Date.
- Work Phone Verified Date: The work phone Verified date.
- Zipcode: The Zipcode information.
Report Variables Selections
If you select the Export Field Selection for "Report Variables".
This will list all the Report Variables that you have created in your system. We have a  option that will allow you to add report variables from this screen.

After selecting all the appropriate fields that you would like to extract. Please select the  button.
Options
After defining your template you can select the options. This can be done by selecting the  .
.
The following screen should appear.
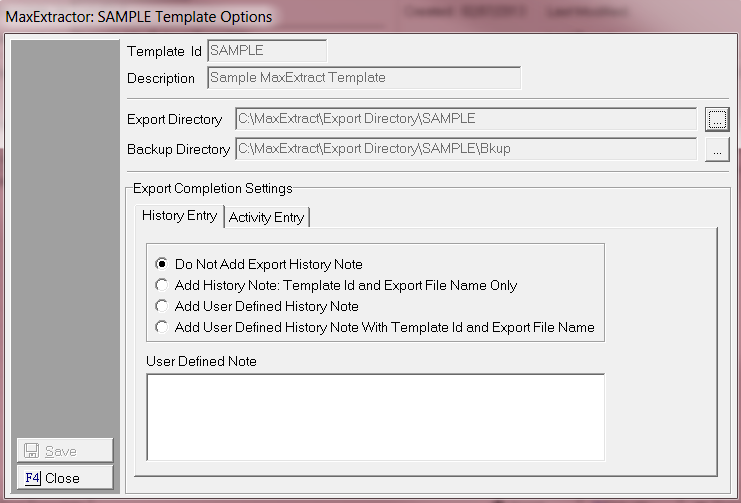
If you filled out the default options sections then your Export Directory and Backup Directory should already be filled out.
The other selections can be selected by selecting the radio button. We only allow you to select one History Entry option and Activity Entry:
For the History Entry: The following selections are available.
- Do not Add Export History Note: This selection will not add an Export History Note.
- Add History Note: Template ID and Export File Name Only: This will add the Template Id and Export File Name Only.
- Add User Defined History Note: This allows you to select a custom history note that will add to each account after export.
- Add User Defined History Note with Template ID and Export File Name: This allows you to select a custom history note that will add to each account after export and it will include a Template ID and Export File Name.
For the Activity Entry:
- Select to add an Activity Code: Select the New Activity from the a list.
Click the  button to save the Default Options.
Processing the Export
After completing your template you are then ready to start exporting fields to the File Format of your choice.
Select the  tab.
tab.
Select the Template that you plan to using the .
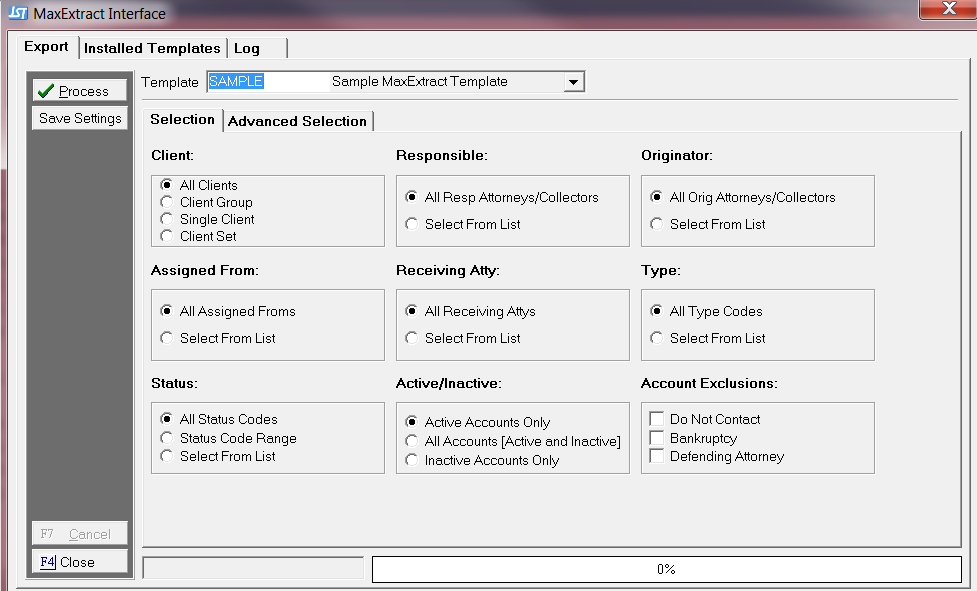
- Client: The Client that you are doing the export for.
- Responsible: The Responsible for the Account.
- Originator: The originator of the Account.
- Assigned From: The Assigned From of the Account.
- Receiving Atty: This will include the Receiving attorney on the account.
- Type: This is the different Type codes on the account.
- Status: This allows you to filter by status.
- Active/Inactive: This allows you to pull accounts that are active or inactive.
- Account Exclusions: To keep the accounts from exporting.
Advanced Selection
We have also provided an Advanced Selection option. To access it click on the  tab.
tab.
The following screen should appear:

- Claim Open Date Range: This allows you to add a Filter for Claim Open Date Range.
- Current Claim Balance: This will allow you to filter the Current Claim Balance on the account.
- Primary Filing Selection: This will filter based on filing requirements selected.
- Claim Closed Date Range: This allows you to add a Filter to Claim Closed Date Range.
- Last Payment Date Selection: This allows you to add a filter for the Last Payment Date on the Account.
- Primary Judgement Selection: This will filter based on judgment requirements selected.
- Account Number Range: This will allow you to filter by Account Number Range.
- Action Items: This allows you to filter by Actions on the account.
Note: The Advance Selection is not mandatory. It is used to help filter your extraction.
Then return to the  tab and click the
  button.
Note: If you run the same type of report multiple times. Take advantage of the save settings button.
Output Files
After selecting button. The following screen should say the following
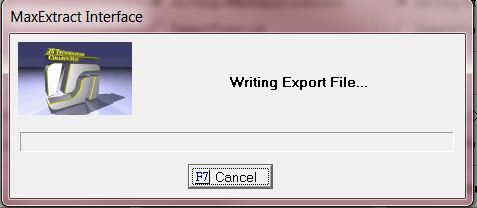
Once the process is completed you will get a screen showing the process is completed.

Another pop up will show the amount of files that were exported .
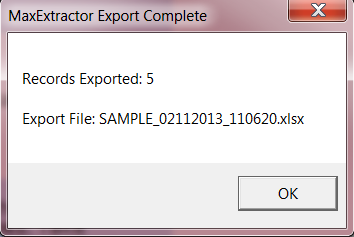
The export can be found in the location you defined on the default options setting or if you customized based on template then look in the location you defined for that.

If you have any exceptions then your exception report will be found in the location you placed it.
Note: Exceptions -are mainly data issues. Instead of getting errors MaxExtract will skip the account and add an entry to the exception list.
MaxExtract audits the data as its Exported.
Log
The MaxExtract also has a log file that gives you a record of your MaxExtract events
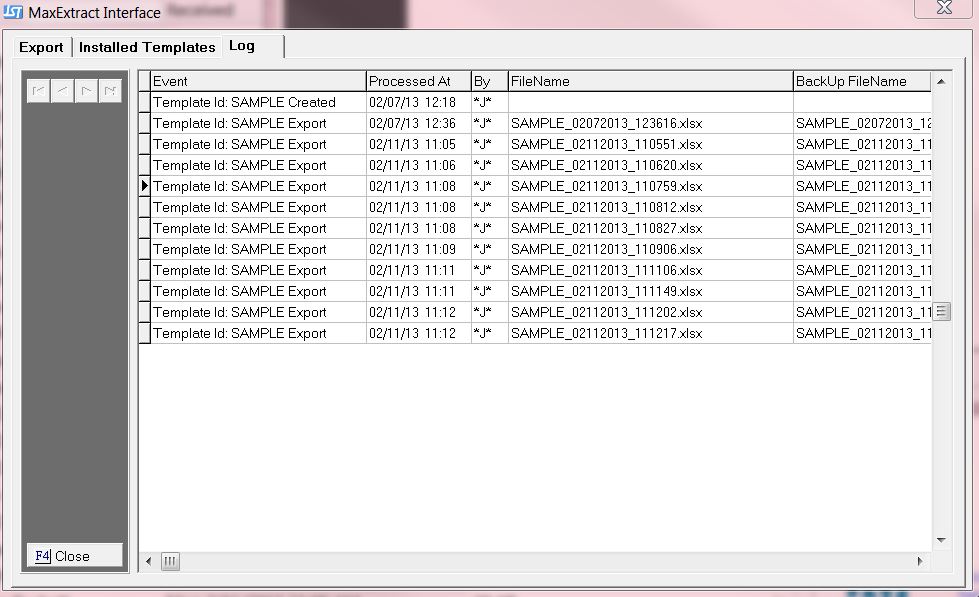
It will show you the times everything was processed, by who, the file name and the backup file location.