 button on the CollectMax toolbar at the top of the CollectMax
window.
button on the CollectMax toolbar at the top of the CollectMax
window.1.
Click the
button on the CollectMax toolbar at the top of the CollectMax
window.
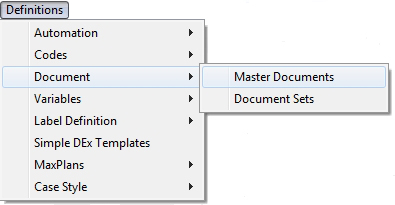
2. Select Documents, Master Documents from lists.
3.
Click the
![]() button on the left panel to create a new document.
button on the left panel to create a new document.
4. In the Create Document Type window, select the document style. Choose Account/Debtor Form for standard debtor letter.
Note: Selecting Legal Form will display the document on the selected Litigation Screen only.

5.
Click the
 arrow and select the appropriate DEFAULT
PRINTER.
arrow and select the appropriate DEFAULT
PRINTER.
6. Give your document a NAME.
![]() .
.
Note: Do not use any slashes, quotes or special characters in your document name.
7. Type in a description for your document in the DESCRIPTION field.
![]()
8.
Click the
![]() button.
button.
9. WordPerfect will open automatically to a blank document. You are now ready to create your document in WordPerfect.
10.
Type your document text into the document. When you come to a position
in your document where you would like to insert a CollectMax variable,
click on the ![]() button. This will open the CollectMax Merge
Toolbar.
button. This will open the CollectMax Merge
Toolbar.
![]()
11.
Select the variable you would like to pull into your document from the
list. The variables are listed in alphabetic order. Note
that you can type the first letter in your variable name and the list
will refresh with the first item starting with your letter. Once you have
selected the appropriate variable, click the Insert button.
12.
Continue entering your text and inserting variables until you have completed
the creation of your WordPerfect document. At this point you may click
![]() on your WordPerfect toolbar and you will return to CollectMax
with your new document created.
on your WordPerfect toolbar and you will return to CollectMax
with your new document created.
13.
Now that you have created your document, it is an excellent time to establish
properties for your new document. These
properties are available to simplify procedures associated with document
generation. Highlight
your new document from the document list and click the  button
on the left panel.
button
on the left panel.