 button.
 1.
From the
main menu of CollectMax, click
the button.
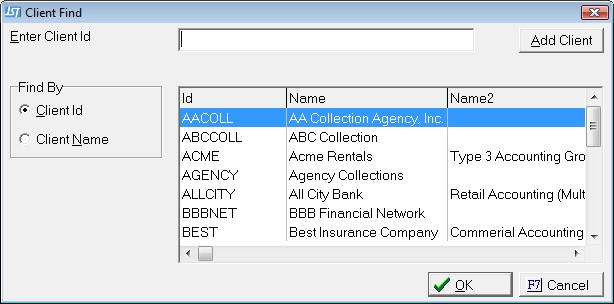
2.
Click the
![]() button.
button.
3. Click in Identifier text box and enter up to a 10 character identification code. More...
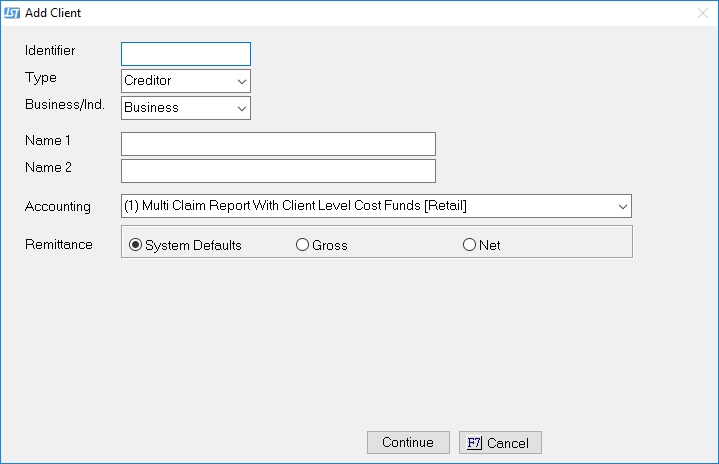
4.
Select
a Type. Click on the  button and select Forwarder or Creditor. More...

5.
Select
Business/Ind.
Click on the button and select Business or Individual.

6. Click in Name 1 text box and enter client name. For long client names, Name 2, can be used. More...
7.
Click on
Accounting button. Click
appropriate accounting option.

8.
Remittance
processing: To choose System default, click System default  radio button and
skip to step 16.
radio button and
skip to step 16.
9. To choose Gross or Net Remittance processing click appropriate radio button.
10.
Click on Commission Rate button and click commission rate or enter a commission rate
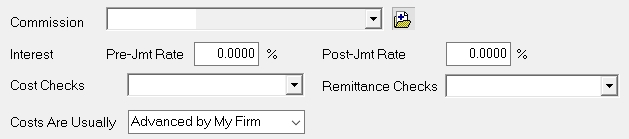
11. Enter a Pre-Judgement interest rate in Pre-Jmt Rate box.
12. Enter a Post Judgment interest rate in Post-Jmt Rate box.
13.
Click on
Cost Checks button and choose appropriate selection.
14.
Click on Remittance Checks button and choose appropriate selection.
15.
In the
Costs are Usually field, Select
either Advanced by My Firm or
Prepaid by Client
from the drop down list .
16.
Click the ![]() button.
button.
17.
Click the
Group button. Choose
a client group code. This step is optional.
18. Click in EIN text box and enter the client's employer ID number.
19. Click the
 to add Name 3 of the Client Name if needed.
20. Click in Contact text box. Enter the person that will serve as the point of contact.
21.Click in Salutation text box and enter client salutation to be used for correspondence.
22.Click in Remarks field and enter any special notes or instructions relating to this client.
23. Click in Address 1 field. Enter the client's address. A second address field, Address 2, is available if needed.
24. Click in City/St/Zip text box and enter the client's city. Tab once and enter client's abbreviated state. Tab again and enter client's zip code.
25. Click in County text box and enter the client's county.
26. Click in Email text box and enter the client's email address.
26. Click in the Website text box and enter the client's website.
27. Click in Phone 1 text box and enter the client's phone number and extension. A second Phone field, Phone 2 is available if needed.
28. Click in Fax text box and enter the client's fax number.
29. If you would like to enter an alternate address, click the  button.
30. Click in Address 1 field. Enter the client's alternate address. A second alternate address line, Address 2, is available if needed.
31. Click in City/St/Zip text box and enter client's alternate city. Tab once and enter client's abbreviated alternate state. Tab again and enter client's alternate zip code.
32. Click in County text box and enter the client's alternate county.
33. Click in Email text box and enter the client 's alternate email address.
34. Click in the Website text box and enter the client's website.
35. Click in Phone 1 text box and enter the client's alternate phone number and extension. A second Phone field, Phone 2, is available if needed.
36. Click in Fax text box and enter the client's alternate fax number.
37.
Click button
 button to save your new client information.
38.
Click the
 button to return to main menu.
See Client Settings and/or Debtor PreSets for additional information about setting all additional settings.