 and then the
  to display the Client Debtor Pre-Sets Debtor Payment screen.
 CollectMax allows you to setup some account defaults such as Payment Allocation, Payment Release Dates and Acknowledgement Letters. Payment Allocations allow you to set the order in which payments pay the account balance components such as principal, interest, fees, costs and other. These settings will default these fields to the selected data when adding a new account or claim. These can be overridden by the data entry person after the account has been added.
From a Client Account, click the and then the to display the Client Debtor Pre-Sets Debtor Payment screen.

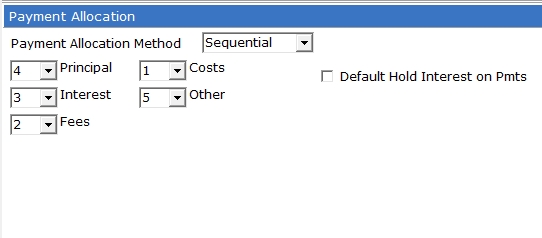
CollectMax allows you to set the balance component allocation of the proceeds of the payments posted to accounts under this client. These settings should be set to what the Client prefers most often. These settings can be overridden when posting a payment.
 to define the order you would like your
payments to be applied to the components of the claim. When a payment is posted it will pay the 1 balance component until it is paid completely then move to the next component. This allocation method is the one most used by Clients.
to define the order you would like your
payments to be applied to the components of the claim. When a payment is posted it will pay the 1 balance component until it is paid completely then move to the next component. This allocation method is the one most used by Clients. Check the  box to by default hold interest on the payments for this client. This option is rarely used.
If your Client or State requires that the payment allocation change at a predetermined date, use the Date Relative Payment Allocation to set the new allocation.
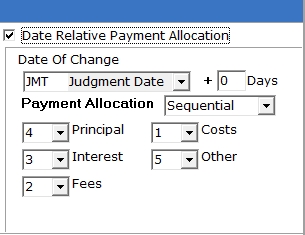
Check the box next to Date Relative Payment Allocations to turn on the settings.
Select the Date of Change from the  list:
list:
Open Date
Judgment Date
Service Date
Filing Date
Enter the number of days after the selected date to start the new payment allocation. If you would like the payment allocation to start on that date, enter a 0 in the Days field.
As above, set the Payment Allocation as either ProRated or Sequential. If choosing sequential, remember to set the right payoff order.
CollectMax will allow you to request a Payment Acknowledgment Letter when a payment is made on an account. This letter will be put on the corresponding print list to be printed at your convenience.

Once the Payment Acknowledgment Letter as been setup in Master Documents, select the letter from the list.
Select the Prompt on the Creation of the letter:
None: No document will be created.
With Confirmation: A confirmation message will be displayed after posting the payment giving the operator the option of placing the document on the print list or not.
Auto: Will put the document on the print list after a payment is posted.
Click the  button next to your selection.
Payment Release dates are set at the system level. You may choose to disable these settings for this particular client. The client settings will by default be set to respect the payment release dates. To Disable them, click the button next to Disable.
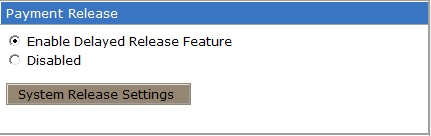
To view the system settings for payment release, click the  button.
Once all the Payment Pre-Set Settings have been set, click the  button.
Note: Changing the payment allocation on the debtor presets tab will only effect the allocations on new accounts added after the change. To change existing accounts, go to the debtor's account and change the allocation manually or do a batch process to change the payment allocations on a group of accounts.